Tuesday, December 20, 2011

Pumpkin Spiced Ice Cream

The ice cream maker...my nemesis.

I loved you so much the day I brought you home. You were hiny and new and smelled good...then I began to loath you as one recipe failed. Then, another. And another. I spent so much money in hopes that I would win you over. Finally, I gave up on you. I stored you in the back of the cabinet, out of sight and out of mind. I forgot about you and all of the embarrassment you laid on me. I forgot your smell and your newness and the hum of your motor.

Then one day, I made a joke to my niece who *hates* pumpkin everything, and said "hmmm...I'm going to make some pumpkin ice cream to go with our pumpkin pie." Why would say such a thing when all you have done over the course of 5 years is fail me? I think it's because I'm a persistent bitch. And, I really want to make a successful ice cream!

On Wednesday, November 23, 2011, I cracked your code and your ice cold heart!

That's right!!! Ice cream SUCCESS!

I promptly threw out your little "recipe book" that does not have one single recipe that tells me to make an ice cream base with eggs. That truly is the secret.

So, now that I'm onto you and your trickiness, I can welcome you back into the family. Instead of the back of the cabinet, you now take center stage next to the blender and food processor. Welcome home, ice cream maker.

PUMPKIN SPICED ICE CREAM

1 cup canned unsweetened pumpkin puree
the seeds of 1 vanilla bean or 1 tsp pure vanilla extract
2 cups heavy cream
3/4 cup firmly packed brown sugar
5 egg yolks
1/2 tsp ginger
1/4 tsp salt
5 grates of fresh nutmeg

In a bowl, whisk together the pumpkin puree and vanilla. Cover and chill for at least 3 hours.

In a heavy saucepan over medium heat, combine 1 1/2 cups of the cream and 1/2 cup of brown sugar. Cook, stirring constantly, until bubbles form around the edges of the pan, approximately 5 minutes.

Meanwhile, in a bowl, combine the egg yolks, cinnamon, ginger, salt, nutmeg. Add the remaining cream and brown sugar. Whisk until the sugar begins to dissolve and the mixture becomes creamy.


Remove the cream mixture from the heat and temper your egg mixture. (Seriously - click on the link to learn how to "temper" your eggs - or else you will make scrambled egg ice cream, and that can't be tasty.) Transfer tempered mixture into the heavy saucepan and cook over medium hear, stirring constantly with a wooden spoon and keeping the custard at a low simmer, until it becomes thick and coats the back of the spoon. Not not allow the custard to boil! Strain mixture through a fine-mesh sieve into a bowl and place the bowl into an ice bath, stirring occasionally to cool. Whisk the chilled pumpkin mixture into your ice cream base. Cover with plastic wrap, pressing it directly onto the surface of the custard, so you don't make a "skin." Chill for 3-24 hours.


After chilling, transfer to your ice cream maker and churn per the manufacturer's instructions. (I have to completely freeze my maker's bowl prior to churning, so there is definitely some plan-ahead activities to be aware of.) Transfer your ice cream into a freezer-safe container and freeze until firm. Scoop and serve!

Our Thanksgiving dessert was pumpk'tastic! Pumpkin pie, pumpkin spiced ice cream and a little drizzle of homemade Carmel sauce. Funny thing is, I didn't taste much pumpkin in the ice cream - just the essence of it, which is fine by me. The ice cream was surprisingly smooth and VERY rich, so one scoop really went a long way. My niece did try a small spoonful, but was not impressed. Oh well. I was! And really, all that matters is that the whole experiment didn't crash and burn.

Pumpkin spiced ice cream is so freaking good!!!


For those looking to make plain vanilla ice cream, I italicized the base ingredients. The recipe itself is pretty easy to decifer. If you'd like to add in something special, prior to churning, throw in whatever you'd like: fresh strawberries, chocolate chips, crushed cookies, etc.

Sunday, August 14, 2011

How To - fluffy gnocchi

The word gnocchi may derive from the Italian word nocchio, meaning a knot in wood, or from nocca, meaning knuckle...and it's easy to see why, because that's exactly what these tasty little potato dumplings look like. For years I have been purchasing pre-made vacuum packed gnocchi at the grocery store, and it's so silly! Gnocchi are fairly easy to make, and taste a hell of a lot better when made with your own two hands, and not vacuum packed, to sit on a shelf for god knows how long. Although I try not to think about it, I do wonder how many chemicals it takes to keep the egg in them from going bad while sitting on said shelf. Hmmmmm....barf.


Gnocchi are often the served as an alternative to soups or pasta in some Italian eateries. I prefer them to be the star of own soups, which then enable those soups to become more of a meal of substance.


Contrary to popular thought - and what the Food Network has been pounding into my head for years, which is why I've never made them before - you DO NOT NEED a potato ricer. A fine strainer and a spoon will do the job quite nicely, and since most home cooks have them at their disposal already, there's no need to take a trip to the local kitchen supply store. Who has that kind of expendable income now-a-days anyway?!


I think it's pretty amazing that you can take 3 simple, everyday ingredients and transform them into something new and exciting.


Little cute pillows of potato GNOCCHI!


Basic Gnocchi

2 large potatoes
2 cups of flour
1 egg
salt, to taste

Peel and dice the potatoes into bite sized pieces, add to a medium pot and fill with water until potatoes are just covered. Bring to a boil over high heat and cook until potatoes are tender. Drain into a fine strainer for 5 minutes, or until potatoes have lost their moisture and are cool to the touch. Set strainer over a large bowl and mash cooked potatoes into the strainer, until your potatoes are "riced" into the awaiting bowl. It should look something like this:


Combine your "riced" potatoes with two cups of flour and one egg and combine using the paddle attachment of your mixer until the dough just comes together, about 1-2 minutes. Do not overwork the dough, as the gnocchi will then become tough.


Collect a handful of dough and roll into a long log, about 1/2 inch in diameter on a slightly floured surface. Cut into 1 inch pieces, then using the tines of a fork, flick each dough piece off, creating the shape and texture of the gnocchi. Place pre-cooked gnocchi in a single layer on a cookie sheet, and repeat until all the dough is used.

Don't worry if your gnocchi don't look uniform...homemade cooking should be rustic!

To cook: place handful of gnocchi in salted, boiling water until it floats to the top. Serve immediately in your favorite gnocchi application! (You can also store your homemade gnocchi for several days in an air tight container, or freeze them for later use.)

Like I said before, I like to beef up my soups with gnocchi, and since I recently dined on soup, salad and bread sticks from a chain that shall not be mentioned - I was inspired to whip up my own version of creamy chicken and gnocchi soup.

Creamy Chicken and Gnocchi Soup

2 tbsp olive oil
2 tbsp butter
3 large carrots, peeled and diced
3 large celery stalks (leafy tops included), diced
1 large onion, diced
2 garlic cloves, finely minced
2 cups pre-cooked chicken - your choice of diced or shredded white and/or dark meat
2 quarts of chicken stock
16 oz. of prepared gnocchi
1 cup of heavy cream
1 tsp each: dried parsley, oregano and thyme
1/4 tsp freshly grated nutmeg
salt and pepper, to taste

Melt oil and butter in a large stock pot over medium heat. Add onion, garlic, carrot and celery and cook, stirring occasionally, until vegetables are tender. Add parsley, oregano and thyme - then add chicken stock and bring to a boil. Drop chicken and simmer for 1/2 hour until the liquid reduces slightly. (You can add more stock if your soup reduced too much.)

Right before service, add gnocchi. When the gnocchi floats, turn off the heat and add the cream, salt and pepper and grated nutmeg. Spoon into shallow dishes and serve with grated Parmesan cheese, if desired.


The texture of this soup is to die for...between the tender chicken and the fluffy, pillow'y gnocchi...I was in heaven! I also baked up some homemade bread to go along with this, so I could dunk the bread into the broth, which was so flavorful.

Truth be told, not only was this dinner - but also breakfast the next morning.

Sunday, June 26, 2011

Frozen Tiramisu

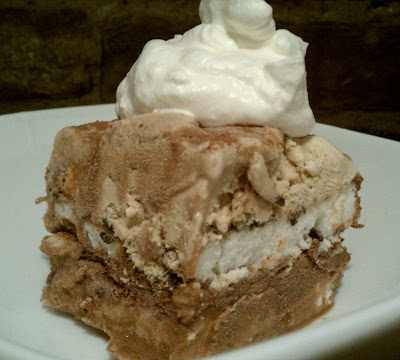
I like Tiramisu. I like ice cream. Is there a way to combine the two? Hell yes! Buck "tradition" and make this...pronto! (And be extremely disappointed when there are no leftovers to chow on.)

Frozen Tiramisu

1 cup sugar
1 1/2 cups strong, freshly brewed coffee
1/3 cup Kahlua liqueur
Pre-made angel food cake
1/4 cup crushed Oreo Cookies
1/2 gallon of chocolate ice cream, softened*
1/2 gallon of coffee ice cream, softened*
whipped cream
Cocoa (for garnish)

Place sugar and 2/3 cups of water into a sauce pan. Bring to a boil over medium heat, stirring occasionally until dissolved. Remove from heat and stir in brewed coffee and Kahlua. Let syrup cool completely.

Meanwhile, spray a 9x9x2 inch baking dish with vegetable spray. Using a serrated knife, cut angle food cake into thin squares, layering along the bottom of the dish. Using a pastry brush, brush the cake layer with the coffee syrup. Sprinkle 2 tablespoons of crushed oreos over cake.

Spread a layer of chocolate ice cream over cake. Place a second layer of angle food cake over ice cream, and once again brush the cake with the remaining coffee syrup. Place in freezer until completely frozen.

Remove from freezer, sprinkle with remaining oreo cookie crumbs, and spread a layer of coffee ice cream over top. Freeze until completely hardened. When ready to serve, top each portion with freshly whipped cream and a sprinkle of cocoa, if desired.


Hello, lover.

*Time saver: If you do not have time to let your ice cream soften, place into a stand mixer bowl and beat on low until spreadable.

I was completely amazed at how great this turned out! The layers of angel food cake absorbed all of the liquid and became this gooey, coffee goodness - and the ice cream just held it all together, making it taste like traditional Tiramisu. It was a big hit at the "going away" dinner party I held for a friend who is going on a mission trip to Africa.


I may have licked my bowl.

Tuesday, February 22, 2011

Very Berry Gummy Squares

My all-time favorite candy is a tie between RED Gummy Bears and RED Sour Patch Kids, so when I came across a recipe in Taste of Home Magazine for making your own gumdrops, I was intrigued, but I had to change it up because I wanted more of an all-inclusive berry taste.

I must admit, I shelved it for quite some time. I like instant gratification and the process of making these provides none of that. There is a full 24-hour waiting period, while the semi-done gumdrops stare at you from across the room, taunting and whispering your name in their gelatenous sweetness. If you have a sweet tooth, like me, it's worse than Chinese Water Torture - or so I would think. The payoff is grand if you can muster up the extreme patience.

These gumdrops are soft and chewy and go down a little too easy, especially if you cut them into small bite sized pieces. They were the most perfect little Valentine's Day gift. I was impressed with how the cranberry flavor wasn't overwhelming, and am left wondering how I could change up the recipe to include other flavors. I have a couple of ideas that center around lemon curd and fruit juices, but that may include adding an additional packet of unflavored gelatin, to balance the liquid out. I'm up for figuring out the science of it all, because they are just that good.

My warning to anyone who makes this must be headed...1.) If you eat too much, you will get a severe stomach ache. And, 2.) Embrace the pink pee and poo! It means your systems are all working! *Sadly, this is not the first time I've mentioned poo on this blog.*


VERY BERRY GUMMY SQUARES


2 envelopes unflavored Knox gelatin
1/2 cup cold water

1 can jellied cranberry sauce

2 cups sugar

2 3-oz packages of raspberry gelatin

1 3-oz package of strawberry gelatin

granulated sugar, for dusting


In a saucepan, sprinkle unflavored gelatin over water. Let stand for two minutes, or until the gelatin softens. Add the cranberry sauce and 1 cup of sugar and cook over low heat until the cranberry sauce is melted and the sugar is completely dissolved, whisking lightly. Remove from the heat and add the raspberry and strawberry gelatin, stirring to completely dissolve.


Coat an 8x8x2'' pyrex baking pan with cooking spray. Dust lightly with sugar, and pour your gelatin mixture into the prepared pan. Cover with plastic and let stand at room temperature overnight.

Cut into 1-inch squares with a knife that you've run until hot water, so it slips through the candy easier. Roll each piece in sugar. Place on baking sheets and let stand for 3 hour
s. Turn pieces over, roll in additional sugar, and let stand an additional 3 hours until very firm.

Store in an airtight container at room temperature until they are gone!