Showing posts with label Fake Take-Out. Show all posts

Monday, January 21, 2013

Pizza Crust

Yesterday I had the biggest craving for pizza.  After spending an hour trying to call my local pizza joint (I kid you not) and not getting through, I gave up and ate a peanut butter and jelly sandwich, which did NOTHING in satisfying my craving.  Today, I took matters in my own hands and decided that if I was going to eat pizza, I was going to have to make it myself, since obviously no one wants to answer my cry for help.

Enter one of my favorite Martha Stewart cookbooks - Favorite Comfort Food, which was printed in 1999. Like most of Martha's recipes, nothing is very basic or easy.  "Proper" pizza dough was going to take about 2 hours to prepare!  I thought to myself..."Self?  You have the day off.  Just do it so you can go to bed with a smile on your face.  Feed to your belly and move on!"

Things you don't need, which are included in the recipe:
  • A pizza wheel - just use a knife
  • A pizza stone - a cookie sheet works just fine
  • A pizza peel - where the FUCK to you store THAT thing?!  Come on Martha!!!
So, although this is Martha's recipe...I have simplified it for the average home cook.  You still will need 2 hours though, so be prepared.

PIZZA DOUGH

(This recipe makes dough for two 12 inch round pizzas or one large square pizza.)

1/4 tsp sugar
1 package of dry yeast, or 2 1/4 tsp
1 cup warm water (about 110 degrees)
2 3/4 cups all-purpose flour
1 tsp salt
1 1/2 tsp olive oil, plus more for oiling your bowl
cornmeal
pizza toppings of your choice

Pour water into a small bowl.  Sprinkle in sugar and yeast and whisk with a fork to dissolve.  Set aside for 5 minutes while yeast activates or "blooms."  Mixture will become slightly foamy.

Meanwhile, mix together flour and salt in a large bowl.  Add olive oil and yeast mixture and combine with your hands, adding more flour if needed, until dough is smooth when squeezed.  Transfer to a clean surface and knead for about a minute, then shape into a ball. 

Oil a large bowl and place your dough ball, smooth side up.  Cover tightly with plastic wrap and place in a warm spot for about 40 minutes, until dough doubles in size.  Remove wrap and punch down with your fist.  Knead for another minute and once again, place dough ball smooth side up and return to let rise a second time, for about 30 minutes until it again doubles in size.

This is when my stomach started to growl.  Preheat your oven to 450 degrees.

Punch down the dough for the second time in preparation for the third rise.  Place dough on a clean, flat surface and let rest for about 10 minutes.  Meanwhile, sprinkle your cooking surface with cornmeal in preparation for your crust!  If making two pizzas, divide your dough in half.*

Using your fists, knuckles and fingers, gently stretch your dough to the size of your cooking surface.  Top your pizza as you wish - I used leftover boneless hot chicken wings, onions, peppers and pepperoni.  And, maybe extra cheese as well.  Bake for 12-18 minutes, let cool and enjoy.

*If you plan on baking only one 12 inch round pizza, wrap up your remaining dough and freeze.  Thaw completely before using. 


This dough had a great chewy crust and baked evenly in my oven, without turning - - but if you have hot spots, you may want to turn once during baking.  This crust has sparked an interest in having a homemade pizza party with my friends and the next time I have a couple hours of free time, I'm making a couple of batches of this dough and freezing it for future uses!
Wednesday, January 04, 2012

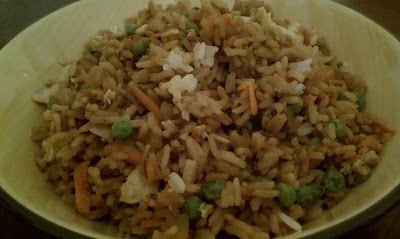
Fried Rice - why order takeout?

I don't know why, but New Years day always makes me crave asian food. Why is this?! Someone please explain!!! Actually, let me think about this for a moment...it could be because New Years is a turning point in America's healthy brigade, and all I can think about (besides the fact that I will not be able to find a parking spot at the gym) is that I want something salty that will give me cankles, high blood pressure and make me hungry a couple of hours later! I've tried my hand at a couple of "asian inspired" dishes throughout the years, but my fried rice has become a staple.

I don't know why more people don't make fried rice at home?! It's easy, and if the rice is already cooked - and left over from your pork chops and applesauce dinner - fast to prepare. It can also be very substantial and satisfying because you can load it with as many vegetables and lean protein as you want! Really, you are limited by your own imagination.


I like making it at home because I like to keep the crunch in my vegetables - something my mother never believed in growing up! A mushy piece of broccoli makes me want to run towards the front door kicking and screaming about the monstrosity of it all. It's funny how I said "growing up" as if her mushy veggie love doesn't still appear to this day. Someone take away her steamer!!!! Or, give her a new kitchen timer that clips to her apron that doesn't go over 6 minutes.

FRIED RICE

2 tbsp vegetable oil
4 large eggs
1 cup onion, chopped
2 garlic cloves, finely diced
1 tsp freshly grated ginger
2 cups of prepared, cooled white rice of your choice*
1 cup cooked and cubed pork or beef
1/2 cup soy sauce, or ginger flavored soy sauce (whatever suites your palette)

1 tsp sesame oil
1 cup frozen peas
1 cup grated carrot

In a large WOK, or skillet heat 1 tbsp of vegetable oil over medium high heat. Add eggs and stir until they form a soft scramble. Remove eggs from WOK and set aside.

Heat remaining vegetable oil over medium high heat. Add onion, garlic and ginger and saute until fragrant, about 2-3 minutes. Add rice and meat, stirring to combine. Add soy sauce and sesame oil, and cook through. Before serving, add frozen peas (they will defrost with the heat of the rice), reserved scrambled egg and carrots. Serve.


That's it...about 10 minutes in prep, total. I've seen fried rice with lots of different kinds of vegetables, seafood and meats...but this happens to be my favorite combination. Oh, and the leftovers are AMAZING!!!

*I use Jasmine rice for all of my rice needs. It's the only kind of rice that I don't seem to burn, and I like the way each individual piece of rice stands on it's own and doesn't clump up or stick.

Friday, February 08, 2008

Vegetarian Sushi

I am in love with making Sushi!

I'm obsessed with it. I've been scouring the internet for tips and tricks. I stopped at the Asian Food Market and grabbed a sushi rolling mat to increase productivity - which set me back a cool 99 cents! I can now chuck my sacraficed bamboo placemat which is pretty much ruined anyway, since I was pushing it past it's regular job of sitting pretty on my table.

It's funny, because although I wince at the thought of eating fish, no matter how I try to tell myself how good it should be - raw fish (particularly red snapper and tuna) is quite tasty. There's no "fishiness" - or there shouldn't be if it's fresh - and I find the texture to be quite similar to the rice in the sushi roll. Plus, if eaten with a dab of wasabi, dipped in soy sauce and chased with a piece of pickled ginger you can barely taste anything else!

I'm not brave enough to try my hand at working with the raw sea animals - but I have been playing around with the colors of the rainbow via the veggie briggade. Peppers in every single hew, carrots, sprouts, avocado, cucumbers, pickles, zuchinni and squash.

VEGETARIAN BROWN RICE SUSHI

2 sheets of Nori (found in Asian Food Markets)
1 carrot, peeled and cut into long, thin strips
1/2 cucumber, seeded and cut into long, thin strips (Do not peel!)
1/2 red bell pepper, cut into long, thin strips
1/2 a ripe avocado, removed from outer skin and cut into strips
1/4 cup mung bean sprouts
wasabi paste
pickled ginger

For Rice:
2 1/4 cups of water
1 cup brown rice
1 tbsp soy sauce
2 tbsp rice wine vinegar

Bring water to a boil in a saucepan. Add rice and soy sauce. Cover with a lid and let rice steam for 40-45 minutes or until done. Remove from heat and transfer to a bowl with a large surface area for cooling. Sprinkle with rice wine vinegar and gentle stir rice to coat. Let stand 20 minutes.

Meanwhile prepare all vegetables.

Lay out your sushi rolling mat onto a clean cutting board or other flat surface, so the slats are perpendicular to your body. Lay a piece of nori on the mat, shiny side down. Using damp fingers, spread a layer of rice over nori, covering the nori almost entirely - leaving a 1 inch strip at the top of the nori, furthest from you. (Doing this will help to seal the roll.)

Spread a very thin bead of wasabi paste in a single line along the edge nearest to you. Be careful with the wasabi, because if you use too much, you will blow yourself and your dinner mates out of the water! Arrange vegetables strips. Using your thumbs, gently begin to roll up the mat, squeezing gently to adhere the nori to itself. Chill roll for 10 minutes or so, then cut into pieces with a very sharp knife.


I served my sushi alongside some pork and vegetable pot stickers.

Now, some may think that brown rice was a strange choice...but I wanted to up the nutrician level and brown rice certainly did the trick. However, if I didn't tell you, you'd probably never know...it still had the same consistancy as traditional sushi (or sticky) rice, but with a slight nutty flavor.


I'm now thinking of ways to create a little sushi dessert roll. (Hummmm.....YUM!)