Showing posts with label Diet Friendly. Show all posts

Monday, July 25, 2022

To zucchini...and beyond!

It's funny how sometimes life throws these head-shaking curve balls at you that don't really make any kind of lasting impact, but can be annoying as all get out.

Last year, we spent a lot of time prepping an overgrown area to become a 50' x 100' vegetable garden. We overturned ground, pulled weeds, added bagged compost, and struggled to maintain water distribution (with a well) and proper harvesting. 

We successfully grew sugar snap peas, tomatoes, potatoes, summer squash, zucchini, cucumbers, onions, pumpkins, and butternut squash. We were less than successful growing peppers and corn - so it became a mission to address the sandy soil which we thought was a corn-growing hindrance.

We hedged our corny bets for this year by creating our own kitchen/yard waste compost area, so that we could reuse our own organic material as fertilizer for the garden and then meticulously maintained and turned that material so that it became rich black gold for the soil. (The addition of chicken poop from the barn also assisted with the compost's nutrient capabilities!) Last Fall we purchased bags of cow shit from a local farmer in our town to enrich our soil even more as we turned over the ground one last time at the end of the growing season. The soil looked (and smelled) like real farm dirt - not sand, or clay which really does have a different aroma. 

We planted with one notation...DO NOT PLANT TOO MANY ZUCCHINI AND SQUASH. Even by only planting a few seeds, we still over-planted.

Every home gardener I know jokes about the productivity of zucchini and summer squash in their gardens on good years, without disease or bugs ravaging your plants. I'm not the first to use "Zucchini Apocalypse" by any means, but I do enjoy conjuring up the images of zombie zucchini, en masse, marching their way into our kitchens, multiplying as they slink along.

I imagine it looks kind of like this:

Fuck. And you should see what is *still* waiting for us in the garden. We just started harvesting, and there are still flowers budding.

I was NOT happy when my husband (yes, husband - as of 7/16/22!) came in loaded to the gills, with vegetables twice the size of my forearms! I knew right there that I was going to have to get creative with the cooking, so that none of this produce goes to waste. Zucchini Bread, which I think is gross, was NOT going to be the end-all to use all of this up. In fact, two cups of grated zucchini was a 1/3 of one of these monsters, and that was after seeding it.

I've been scouring the internets searching for recipes to rid us of the onslaught of zucchini and summer squash. 

Last year I discovered the beauty of Zucchini Relish - it's a simple substitution from your regular cucumber/pickle relish, but with more color. I can pints and half pints using a water bath, and it is delicious. Better yet, no one knows it's not traditional pickled relish until we tell them. Same crunch and bite.

I also make Zucchini and Summer Squash pickles, which are amazing on grilled chicken and burgers. Freezing cubes, rounds, and grated veg is also a go-to, but honestly we are still trying to knock off last year's harvest, so I don't want to go too far in that direction. 

So, as we delve further into the Zucchini Apocalypse, I'll be testing more zucchini and squash recipes and sharing them here. Starting....now.

Cheesy Zucchini Smash Cakes 

Baked zucchini pancakes.

Ingredients:
2 cups grated zucchini
1 cup panko breadcrumbs
1 cup shredded sharp cheddar cheese
2 eggs
1 small shallot, minced
1 clove of garlic, minced
Salt and pepper, to taste

Additions: Substitute summer squash for zucchini; add fresh herbs of your choosing; add crumbled bacon; substitute shallot/garlic for onion and/or garlic powder.

Preheat oven to 400 degrees. 

Grate zucchini, and place in the center of a clean kitchen towel. Gather up the towel, and squeeze out the liquid from the zucchini. (I use this technique with frozen spinach dishes, as well as some jam preparations that I want to reduce liquid for before cooking.) 

 You want a semi-dry ball of zucchini to add to your bowl. In the same bowl, add all ingredients and mix with your hands to incorporate thoroughly.

Once fully incorporated, take 1/4 cup of the mixture and shape it into a mini pancake, pressing hard. Gently place on a silpat-lined baking sheet. Bake at 400 degrees for 25 minutes, or until golden brown.


Serve any way you'd like, but I used them as the English Muffin base for an eggs benedict'like dish that blew us away. (And yes, that is indeed a broken Hollandaise! I froze the last batch I made to see if it would stand up...it doesn't, but it still had all the flavor.) The Zucchini Smash Cakes can also be used as an appetizer with a little sour cream and chive, or crème fraîche and smoked salmon if you want to be fancy. I'm sure a topping of caviar would be lovely for people who like that.


This is most definitely a recipe I am keeping in my zucchini arsenal for the rest of the summer! 

Now I am off to find a zucchini ice cream recipe because if I have to eat the stuff, I might as well find interesting ways to incorporate it.

Sunday, May 16, 2010

Seared Drunkin' Chicken

Even though I had only two guests over the other night for food and wine, I will herein call my little gathering a "dinner party." I'm really not sure what the socially accepted rules are to call such a gathering a "party," but I've decided that I make my own rules on this blog! So it shall be.


There were so many foodie ideas going on in my head that I wanted to try, now that I had a captive audience at my disposal. I threw some ideas out to one of guests and got very, very nervous when every reply was "Ew" and "I'm not a fan." I wanted something light (to save room for the copious amounts of wine and CAKE we would consume), but also something easily identifiable, since this would be the first time I would be cooking for these girls. Then it hit me...


DEARED DRUNKIN' CHICKEN


Boneless, skinless chicken breasts
2 tbsp butter, divided
2 tbsp olive oil, divided
1 large (or 2 small) shallots, sliced thin
1 clove garlic, finely minced
2 cups of vermouth or dry white wine
2 cups of chicken stock
2 tbsp dijon mustard
2 tbsp apple cidar vinegar
1 lb of fresh baby spinach
2-3 tbsp fresh basil, ciffonade
Salt and pepper, to taste
Halved cherry tomatoes, if desired


Preheat oven to 375 degrees.


Heat 1 tbsp each of butter and oil in a large skillet. Season both sides of chicken breast with salt and pepper, and place top-side down in pan. Cook until chicken is nicely browned, flipping only once. (Chicken does not have to be cooked through.) Place chicken in a large glass baking dish.


Meanwhile, heat remaining butter and oil in a deep saucepan. Add sliced shallot and cook until shallot is translucent. Add vermouth, chicken stock, mustard and vinegar to shallots, stirring occassionally, and boil until mixture reduces to half. Once reduced, immediately pour over chicken in baking dish and bake in the oven for 25 minutes.


While chicken is baking, re-heat the large skillet. Add minced garlic and spinach, turning to wilt the spinach. (You may need to add a little more oil.) Season with salt and pepper.


To plate: Spoon out a portion of spinach in the bottom of a shallow bowl. Arrange cooked chicken on top of spinach. Place cherry tomatoes around the dish, if desired (I think the dish needed another color to make it pop!). Spoon broth on top of chicken and garnish with the chiffonade of fresh basil.


I served some Pinot Grigio to bring out the flavor of the vermouth in the broth.

The dish was lovely! Simple, pretty and full of flavor. The raw tomatoes softened up nicely when the hot broth was poured over the top. The perfect bite included a piece of chicken, some spinach and a tomato half!

Friday, February 08, 2008

Vegetarian Sushi

I am in love with making Sushi!

I'm obsessed with it. I've been scouring the internet for tips and tricks. I stopped at the Asian Food Market and grabbed a sushi rolling mat to increase productivity - which set me back a cool 99 cents! I can now chuck my sacraficed bamboo placemat which is pretty much ruined anyway, since I was pushing it past it's regular job of sitting pretty on my table.

It's funny, because although I wince at the thought of eating fish, no matter how I try to tell myself how good it should be - raw fish (particularly red snapper and tuna) is quite tasty. There's no "fishiness" - or there shouldn't be if it's fresh - and I find the texture to be quite similar to the rice in the sushi roll. Plus, if eaten with a dab of wasabi, dipped in soy sauce and chased with a piece of pickled ginger you can barely taste anything else!

I'm not brave enough to try my hand at working with the raw sea animals - but I have been playing around with the colors of the rainbow via the veggie briggade. Peppers in every single hew, carrots, sprouts, avocado, cucumbers, pickles, zuchinni and squash.

VEGETARIAN BROWN RICE SUSHI

2 sheets of Nori (found in Asian Food Markets)
1 carrot, peeled and cut into long, thin strips
1/2 cucumber, seeded and cut into long, thin strips (Do not peel!)
1/2 red bell pepper, cut into long, thin strips
1/2 a ripe avocado, removed from outer skin and cut into strips
1/4 cup mung bean sprouts
wasabi paste
pickled ginger

For Rice:
2 1/4 cups of water
1 cup brown rice
1 tbsp soy sauce
2 tbsp rice wine vinegar

Bring water to a boil in a saucepan. Add rice and soy sauce. Cover with a lid and let rice steam for 40-45 minutes or until done. Remove from heat and transfer to a bowl with a large surface area for cooling. Sprinkle with rice wine vinegar and gentle stir rice to coat. Let stand 20 minutes.

Meanwhile prepare all vegetables.

Lay out your sushi rolling mat onto a clean cutting board or other flat surface, so the slats are perpendicular to your body. Lay a piece of nori on the mat, shiny side down. Using damp fingers, spread a layer of rice over nori, covering the nori almost entirely - leaving a 1 inch strip at the top of the nori, furthest from you. (Doing this will help to seal the roll.)

Spread a very thin bead of wasabi paste in a single line along the edge nearest to you. Be careful with the wasabi, because if you use too much, you will blow yourself and your dinner mates out of the water! Arrange vegetables strips. Using your thumbs, gently begin to roll up the mat, squeezing gently to adhere the nori to itself. Chill roll for 10 minutes or so, then cut into pieces with a very sharp knife.


I served my sushi alongside some pork and vegetable pot stickers.

Now, some may think that brown rice was a strange choice...but I wanted to up the nutrician level and brown rice certainly did the trick. However, if I didn't tell you, you'd probably never know...it still had the same consistancy as traditional sushi (or sticky) rice, but with a slight nutty flavor.


I'm now thinking of ways to create a little sushi dessert roll. (Hummmm.....YUM!)

Tuesday, February 05, 2008

Beets...lunch ladies beware

Walking through the grocery store last night without a menu or list in mind, put my brain into a tail spin. I continued through the produce aisles, glancing at boring button mushrooms, overgrown eggplant and yellowed icebugh lettuce. I was in an idea rut until I happened upon a bunch of yellow organic baby beets. So tiny and so cute! I also selected a bunch of organic red baby beets as well, and the tide started to turn.

At home, I scrubbed my beets with a spud scrub and let them air dry. I grabbed a couple of carrots, peeled them and set them aside as well. Since the baby beets were so young, I decided to leave them unpeeled. The skins were so thin anyway that it seemed like a waste (of time and nutrients) to remove them.

ROASTED BEET SALAD (served hot or cold)

1 bunch of baby yellow beets, trimmed, scrubbed and cut in half
1 bunch of baby red beets, trimmed, scrubbed and cut in half
4 carrots, peeled and cut into 1/2 inch pieces (keep in similar size to beets)
3 tbsp olive oil, divided
salt and pepper
3 tbsp chopped fresh parsley
1 tbsp balsamic vinegar

Preheat oven to 400 degrees. Prepare all vegetables and place on a baking sheet. With your fingers, mix together vegetables, 2 tbsp olive oil and salt and pepper until coated. Roast for 30 minutes, flipping vegetables half way through.

Remove from heat and place vegetables into a bowl. Add reserved olive oil, fresh parsley and vinegar. Season with salt and pepper, if needed. Serve warm, or chill for two hours if you prefer your salad cold.

I served this earthy salad alongside a portabello mushroom burger with avocado, tomato and onion. It was a beavy of colors and textures - which was just heaven to me!


Be warned though - - eating too many red beets may cause your poo to turn purple. Just trust me on this.

Friday, January 25, 2008

Poached Pears with a Simple Fruit Salad

I've been craving dessert like no body's buisness lately - probably because I am trying to restrict myself from sugary foods in an effort to get back on track after the holidays, which pretty much isn't as bad as I thought it would be. However, the other day I went to a local produce outlet and was blown away by all of the beautiful fruits and vegetables at just pennies! For $19 and change, I bought: a cantelope, 3 kiwi fruits, 2 pears, 1 pint each of blueberries and blackberries, 1 lb of strawberries, a cucumber, 1 red pepper, 1 bunch of flat leaf parsley, a loaf of crusty Italian bread and some feta cheese. How exciting is that?!??

Back when I made the White Chocolate and Spiced Pear Tiramisu, I really enjoyed the soft graininess of the poached pears, and immediately wanted to try a different kind of dessert that involved those wine poached pears. A perfect inspiration!

The following is the result:

WINE POACHED PEARS WITH A SIMPLE FRUIT SALAD

Poaching liquid:
4 ripe Anjou pears, peeled but left whole
2 cups of dry Vermouth
2 cups of pear nector
4 whole cloves
1 cinnamon stick
1 vanilla bean, split
4 tbsp honey

Fruit Salad (cut into small pieces):
1/2 cantelope
1 lb strawberries
1 pint blueberries
1 pint blackberries
3 kiwi fruit

In a deep saucepan, combine all sauce ingredients. Drop in peeled pears and bring liquid to a boil. Drop heat to a simmer and cook for 30-40 minutes, or until the pears are fully poached and soft when pierced with a knife. Remove pears from heat and set aside. Increase heat and bring the liquid to a boil, cooking until liquid is reduced and thick. Let cool.

Meanwhile, cut up all fruit salad ingredients into small pieces (as this resembles a salsa of sorts). Place in a bowl and keep chilled until service.

For service: Place fruit salad in a bowl, creating a crater in the middle for the poached pear to sit. Position pear, and drizzle sauce over everything. Add a sprig of mint (I only had parsley on hand!) to the pear for a bit of whimsy. If desired, sprinkle a touch of powdered sugar over dessert, or add a dollop of fresh whipped cream. Stand back and take the compliments!


Not only are you eating every color in the rainbow - which the experts say is beneficial, but you are also experiencing a bunch of different tastes and textures. This dessert was the perfect ending to a light meal, and was not much fuss to prepare (although it did remind me that it is time to sharpen my knife). Plus, how pretty!

Edited to add: Son of a Bitch!!! I thought I was being super cleaver creating a new recipe...but epicurious.com had a very similar recipe (and picture) for almost the exact same thing! Sigh.

Friday, September 07, 2007

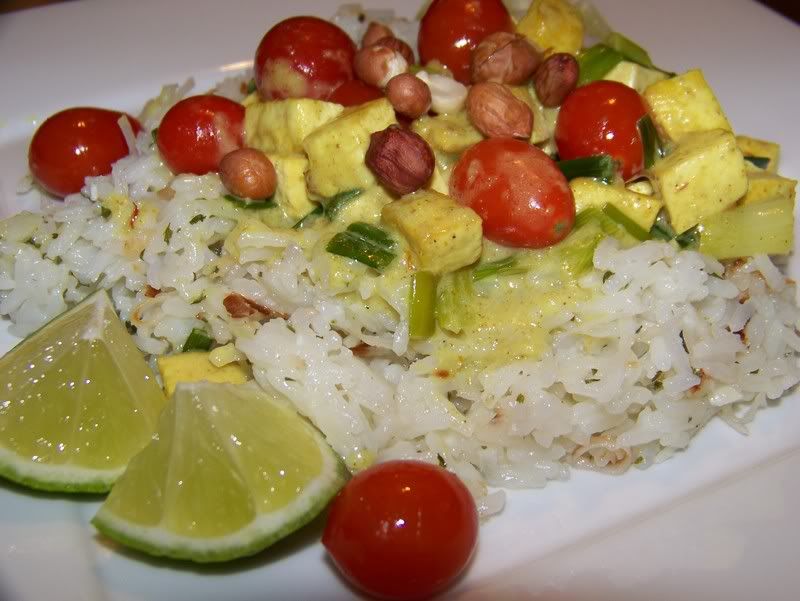
Coconut Curried Tofu with Green Jasmine Rice

When I type "tofu" most people say "ewwwww!" Truth of the matter is, tofu takes on the flavors that you are cooking with, and is a great alternative, or substitution to meat in some dishes. It's not just for vegetarians, I swear! I tend to use the extra-firm variety because it has the texture that I prefer.

This particular recipe has a lot of big flavors that blend perfectly. Garlic, lime, ginger, cilantro, curry and cumin. YUM!!! You'll smell for days, but it is so worth it!

COCONUT CURRIED TOFU with GREEN JASMINE RICE


1/4 cup unsweetened shredded coconut

2 cups water
1 tsp salt
1 cup jasmine or basmati rice

1 big handful of coarsely chopped fresh cilantro (if you do not like cilantro, you can use parsley)
3/4 cup unsweetened light coconut milk
4 tsp minced fresh ginger
1 tbsp fresh lime juice
2 large garlic cloves, minced

2 tbsp vegetable oil
16 oz. extra firm tofu, drained, patted dry and cut into 1/2 inch cubes
1/2 cup thinly sliced green onion
2 tsp curry powder
1 tsp ground cumin
1/8 tsp dried crushed red pepper flake
1 cup whole small cherry (or grape) tomatoes

2 tbsp coarsely chopped peanuts

Brown shredded coconut in a small saucepan over medium heat, stirring constantly. Set aside.

Bring water and salt to a boil in a heavy saucepan. Stir in rice; return to a boil. Reduce heat to low, cover and simmer until water is absorbed and rice is tender - between 18 to 20 minutes.

Meanwhile, puree cilantro (parsley), 1/2 cup coconut milk, 1 tsp ginger, lime juice and half of the garlic in a blender until smooth. Set aside.

Heat oil in a large non-stick skillet over high heat. Add tofu and stir fry until golden. Add onions, curry, cumin, red pepper flakes, remaining ginger and remaining garlic. Stir fry for 1 minute. Stir in remaining coconut milk, and season with salt and pepper. Right before service, add tomatoes. The residual heat will soften the skins without turning the tomatoes to complete mush.

When rice is finished cooking, stir in shredded coconut and cilantro puree until combined. For service, spoon rice onto plate. Top with tofu mixture and sprinkle with peanuts. Garnish with a little lime, and right before digging in - squeeze that lime over the dish. It adds a wonderful brightness to the whole meal.


I liked this meal the further I got into eating it, which is just strange. The tofu resembled chicken in taste and texture, and the warmed tomatoes exploded when you bit into them. Each bite had a different flavor - which was so cool. The leftovers were even good!

Of course, my major flaw (which you can see from the picture) is that my rice is not green. The cilantro looked disgusting at the store, and the parsley looked even worse so I used dried parsley instead. It worked, but didn't give that green verdant color that I really wanted. Although, green rice would probably turn a lot of people off!