Someone forgot to tell Mother Nature that it is Spring - as I look out my window to see 2 inches of snow and slush...maybe if I cook springlike, it will encourage the change of the season. Maybe?
Monday - Spring Lamb Chops, with a Balsamic Tarragon Reduction and Roasted Baby Red Potatoes
Tuesday - Chicken Picatta
Wednesday - Chickpea and Potato Tikka Masala over Curried Rice
Thursday - Fresh Asparagus and Chicken Casserole
Friday - (Work Event)
Saturday - Homemade Individual Specialty Pizza's
Alternate Menu: Butternut Squash Soup
Monday, April 16, 2007

Monday, April 09, 2007
Eating Easter - Part 2
The ham was good - for ham. I'm not a big fan of ham, especially spiral ham - it's salty, and there was more fat on it than meat. My mother burnt some water (I kid you not) and filled a serving bowl with raw carrots, instead of the steamed ones she tried to make. That trick caused my niece to break out in a fit of laughter, which broke the silence, and the piss poor mood my younger brother was in!
The evening finished off with a couple of episodes of "Flavor of Love" with is the most unwatchable trainwreck in the history of bad television - and I love it!
The evening finished off with a couple of episodes of "Flavor of Love" with is the most unwatchable trainwreck in the history of bad television - and I love it!
Sunday, April 08, 2007
Eating Easter - Part 1
HAPPY EASTER FELLOW FOODIES! (or Passover, or whatever you may celebrate this weekend)
I am looking forward to my family's Easter feast tonight...and thought I'd share some dessert and specialty items I made to bring along.
 How about some bunny cookies - 8 inches tall?! I used my Delux Sugar Cookie recipe and an extra large Easter Bunny cookie cutter, then spent a little time and effort decorating them. I only did 3 - one for my bro, the niece and nephew - so it wasn't too bad. After they dried, or rather...I thought they dried, I placed them each in a small plastic food bag. I can't wait to pass them out! The kids are going to FLIP!
ANGEL LUSH with PINEAPPLE (recipe from both www.dole.com and www.coolwhip.com)
1 20 oz can crushed pineapple, with juice undrained
1 4 oz package vanilla flavored pudding
1 container* cool whip whipped topping
1 10 oz package of prepared angel food (or make your own)
Seasonal berries
If you are making your own angel food, you can use this recipe, or do as I did and enlist the help of Pilsbury! (I mean, why make things harder than they have to be?) I don't really like my store's angel food cake, or I totally would've bought a prepared one.
In a large bowl, combine pineapple, with juices, and vanilla pudding mix. Gently fold in the whipped cream. (*The original recipe calls for only 1 cup of whipped cream, but it is not enough! I used the entire tub, then added a few yellow food coloring drops to give the mixture more color.) Set aside for 5 minutes. Meanwhile, cut the angel food cake into three layers, with a serrated knife.
To assemble: Place 1st layer of cake on your plate, and top with 1/3 of your whipped cream mixture. Repeat 2 more times. Top cake with freshly washed and dried berries of your choice. (I filled the hole with them as well) Sprinkle with powdered sugar on top, if desired.


Saturday, April 07, 2007
Banana Bread
YUM!!! I wish this blog has smell-o-vision!

I've tried a couple of recipes - and this one is definitely the winner, hands down. The bread is moist all through, and the crust has a sugary crispness that is just the perfect finish. (I eat Banana Bread from the bottom, up - savoring the top as I go - kinda like the top of a muffin!)
KAT'S BANANA BREAD
1 cup sugar
2 cups flour
1 tsp baking soda
1 tsp salt
2 eggs
1 cup banana (2-3 bananas, depending on size)
1 tbsp vinegar, plus milk to make a 1/2 cup in total (let sit 15 minutes)
Preheat oven to 325 degrees. Mix together your vinegar and milk and set aside. Prepare your bread pan with a spray of cooking spray and a light coating of flour - to prevent sticking.
Meanwhile, in a large bowl, combine sugar, flour, soda, salt and eggs. Add milk mixture and mix well to combine. In a small bowl, smash bananas until creamy. Add bananas to batter. Mix to combine. Pour into bread pan. (Lick the spoon! It's even better than cake batter!) Bake in the oven for approximately 70-80 minutes, until a toothpick stuck in the center comes out clean. Cool on a wire rack. Slice, and serve with a huge glass of iced cold milk!
To store: Wrap bread in a tin foil, and keep 3-5 days.

Wednesday, April 04, 2007
Risotto Rice Balls
The ways of risotto, part II:
 I have never been let down by Martha Stewart. Her cookbooks are filled with wonderful recipes and pictures (!!!!) and her tips and technics always seem to work. My general "cooking" has increased tri-fold with her assistance. Martha's Hors D'Oeurves Handbook is another winner, in my book. I first used the cookbook back around Thanksgiving time when I "tested" the rice ball recipe, as well as a couple other appetizer yummies...all were excellent!
The rice balls satisfied, without being heavy in your stomach - and were great with accompanying sauces, like pesto and salsa, or cheese dips. I thought that they could be placed on an even higher pedistal - taking the main stage in a meal.
RISOTTO RICE BALLS
2 cups prepared risotto, of your choice (great way to use your leftovers!) - chilled
1 cup italian bread crumbs
4 cups of vegetable oil
small cubes of your favorite cheese - I used fontina
 Heat oil in a large skillet over medium high heat. Meanwhile, take approximately 1 - 1 1/2 tbsp of risotto into your palm. Carefully place a cube of cheese in the center, and form a ball around the cheese - totally incapsulating it. Roll ball in bread crumbs, then place in the hot oil. Fry until brown, turning once to cook each side. Remove when browned, and place on a rack to cool. Serve either warm, or chilled.
I have never been let down by Martha Stewart. Her cookbooks are filled with wonderful recipes and pictures (!!!!) and her tips and technics always seem to work. My general "cooking" has increased tri-fold with her assistance. Martha's Hors D'Oeurves Handbook is another winner, in my book. I first used the cookbook back around Thanksgiving time when I "tested" the rice ball recipe, as well as a couple other appetizer yummies...all were excellent!The rice balls satisfied, without being heavy in your stomach - and were great with accompanying sauces, like pesto and salsa, or cheese dips. I thought that they could be placed on an even higher pedistal - taking the main stage in a meal.
RISOTTO RICE BALLS
2 cups prepared risotto, of your choice (great way to use your leftovers!) - chilled
1 cup italian bread crumbs
4 cups of vegetable oil
small cubes of your favorite cheese - I used fontina
 Heat oil in a large skillet over medium high heat. Meanwhile, take approximately 1 - 1 1/2 tbsp of risotto into your palm. Carefully place a cube of cheese in the center, and form a ball around the cheese - totally incapsulating it. Roll ball in bread crumbs, then place in the hot oil. Fry until brown, turning once to cook each side. Remove when browned, and place on a rack to cool. Serve either warm, or chilled.

The risotto balls were nice and crisp on the outside, and tender and creamy on the inside - with a special surprise of melted cheese right in the center! I placed them atop a HUGE salad (we aren't mini salad people!) of baby spinach, sectioned grapefruit and navel oranges, smoked cheddar cheese, chicken cubes and other colorful vegetables. I dressed the salad with a little balsamic dressing, and dinner was served!

A close-up of all the goodness!
Tuesday, April 03, 2007
Risotto
Risotto is one of those dishes that scares a lot of people for some reason. Maybe because it is a bit on the labor intesive side - or maybe because the dish itself has such high expectations. Who knows?! For me, the time and labor pay off in the end, with a dish that is flavorful, and creamy - and if you add a little somethin' somethin' at the end - colorful and/or cheesy! (And, who doesn't like Cheese!)
Making risotto is definitely one of those preparations you should commit to memory and have in your overall "bag of culinary tricks." Once you get the idea down, you can add anything you'd like, from mushrooms to squash to lemons to peas to herbs...whatever you'd like, to make it your OWN.
The recipe below is my own take on "basic" risotto - the leftovers of which will appear in tonight's dinner in a completely different form. (ohhhhhhhh, ahhhhhhhhhh!) Naturally, I adjusted the recipe a bit to ensure that leftovers would be had.
KAT'S BASIC RISOTTO
1 cup arborio rice
2 tbsp extra virgin olive oil
1 tbsp butter
1 onion, finely chopped
1 garlic clove, finely minced
6 cups of chicken stock
1/2 cup dry vermouth
3 tbsp freshly grated fontina cheese (my addition - traditionally, you would use parmesan cheese)
salt and pepper, to taste
Empty chicken stock into a saucepan, and keep at a gentle simmer. (Keeping your stock at a simmer throughout, keeps the cooking process moving - as you are dealing with heated liquids, as opposed to cold liquids that will stunt the cooking process.)
In a large skillet, heat oil and butter over medium to high heat until butter melts. Add rice, onion and garlic, stirring to fully coat with the fat. Cook until onion becomes translucent, approximately 2-3 minutes. Add vermouth, stirring rice until combined. Continue cooking until most of the liquid cooks out. (Keep stirring! It's the stirring motion that will give you the desired creaminess in your risotto.)
Once vermouth is cooked out, add 1 cup of chicken stock, repeating the process of cooking and stirring. Repeat step until the risotto is cooked through. Season with salt and pepper. Finally, add in any additions - herbs, vegetables, cheese, etc - and stir to combine. Serve!

Risotto makes a great side dish - but depending on what you add, it can also be a very suitable meal!
Making risotto is definitely one of those preparations you should commit to memory and have in your overall "bag of culinary tricks." Once you get the idea down, you can add anything you'd like, from mushrooms to squash to lemons to peas to herbs...whatever you'd like, to make it your OWN.
The recipe below is my own take on "basic" risotto - the leftovers of which will appear in tonight's dinner in a completely different form. (ohhhhhhhh, ahhhhhhhhhh!) Naturally, I adjusted the recipe a bit to ensure that leftovers would be had.
KAT'S BASIC RISOTTO
1 cup arborio rice
2 tbsp extra virgin olive oil
1 tbsp butter
1 onion, finely chopped
1 garlic clove, finely minced
6 cups of chicken stock
1/2 cup dry vermouth
3 tbsp freshly grated fontina cheese (my addition - traditionally, you would use parmesan cheese)
salt and pepper, to taste
Empty chicken stock into a saucepan, and keep at a gentle simmer. (Keeping your stock at a simmer throughout, keeps the cooking process moving - as you are dealing with heated liquids, as opposed to cold liquids that will stunt the cooking process.)
In a large skillet, heat oil and butter over medium to high heat until butter melts. Add rice, onion and garlic, stirring to fully coat with the fat. Cook until onion becomes translucent, approximately 2-3 minutes. Add vermouth, stirring rice until combined. Continue cooking until most of the liquid cooks out. (Keep stirring! It's the stirring motion that will give you the desired creaminess in your risotto.)
Once vermouth is cooked out, add 1 cup of chicken stock, repeating the process of cooking and stirring. Repeat step until the risotto is cooked through. Season with salt and pepper. Finally, add in any additions - herbs, vegetables, cheese, etc - and stir to combine. Serve!


Risotto makes a great side dish - but depending on what you add, it can also be a very suitable meal!
Monday, April 02, 2007
Weekly Meal Planning
I both Monday (today!) and Friday off this week from work and I am ever so excited, especially since Easter Sunday is fast approaching...and thus, Easter Sunday menu planning!
Monday - Baked Chicken with Risotto
Tuesday - Spinach Salad with Egg, Citrus and Risotto Rice Balls
Wednesday - Meatball Parmesan Subs
Thursday - Sausage and Pepper Bowties
Friday - (skipping Pizza Day this week) - Stuffed Jumbo Shrimp
Saturday - everything Calzones
Monday - Baked Chicken with Risotto
Tuesday - Spinach Salad with Egg, Citrus and Risotto Rice Balls
Wednesday - Meatball Parmesan Subs
Thursday - Sausage and Pepper Bowties
Friday - (skipping Pizza Day this week) - Stuffed Jumbo Shrimp
Saturday - everything Calzones
Friday, March 30, 2007
Bulgogi
Korean food anyone? Growing up I was a meat and potatoes kind of girl. We just didn't do ethnic food of any kind (even Chinese take out) until I was well into high school - and even then, it was basic Chicken and Broccoli. It wasn't until I started dating Nathan, who is 1/2 Korean (his mom), that a whole new world opened up to me.
And, he reminds me every time we eat anything remotely "un-american."
For a while I have been wanting to make Bulgogi (Korean BBQ Beef) at home. I always thought it was too complicated...too time consuming. It's not - and what makes it even easier, is that you can do most of the prep work the night before. (I tastes better that way anyway!) The most complicated part of the meal is making the rice!

If you have an Asian Market in your city, take a visit, and pick up some Kimchi, pickled Diakon Radish, and Gochujang - a spicy chili paste. (And, look for a product called "Lux" - the body wash is amazing!!!) You will then be on your way to absolute deliciousness!
KOREAN BULGOGI
1 lb top sirloin
3 tbsp soy sauce
1 tbsp sesame oil
1 garlic clove, minced
1 tsp white sugar
salt and pepper
3 green onions, sliced on an angle
1/2 cup sliced white button mushrooms
lettuce of your choice
prepared rice
The night before: Slice beef super thin. (Hint - stick the beef into the freezer until the meat just begins to freeze - it will make slicing it a lot easier!) Place beef, green onions and mushrooms into a zip-locked plastic bag. In a small bowl, combine soy sauce, sesame oil, garlic, sugar and salt and pepper. Pour into bag. Refridgerate over night, turning bag once halfway through.
Day of: Make rice. Preheat an indoor grill pan. Once pan is hot, place marinated beef and vegetables on grill and cook until beef is no longer pink. Remove from heat.
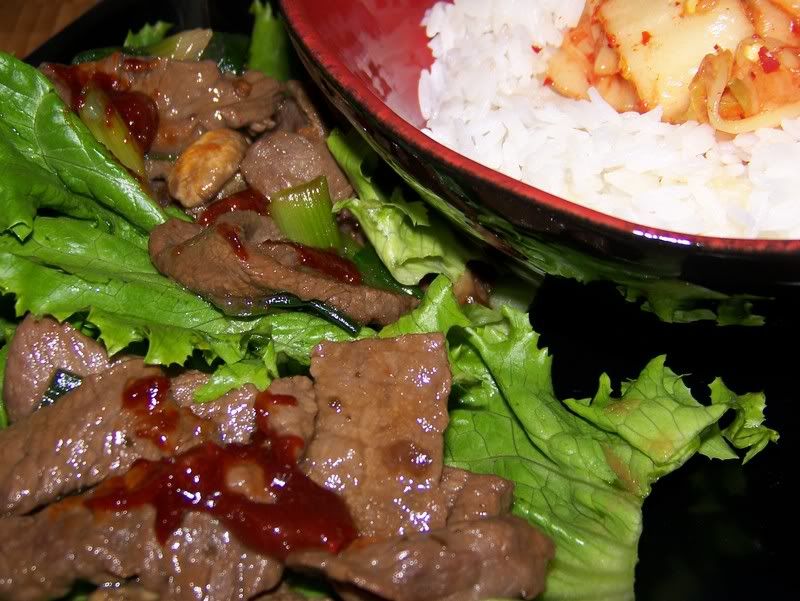
To eat: Wrap meat, vegetables and rice inside a lettuce leaf. Top with a little Gochujang. Enjoy!

And, he reminds me every time we eat anything remotely "un-american."
For a while I have been wanting to make Bulgogi (Korean BBQ Beef) at home. I always thought it was too complicated...too time consuming. It's not - and what makes it even easier, is that you can do most of the prep work the night before. (I tastes better that way anyway!) The most complicated part of the meal is making the rice!
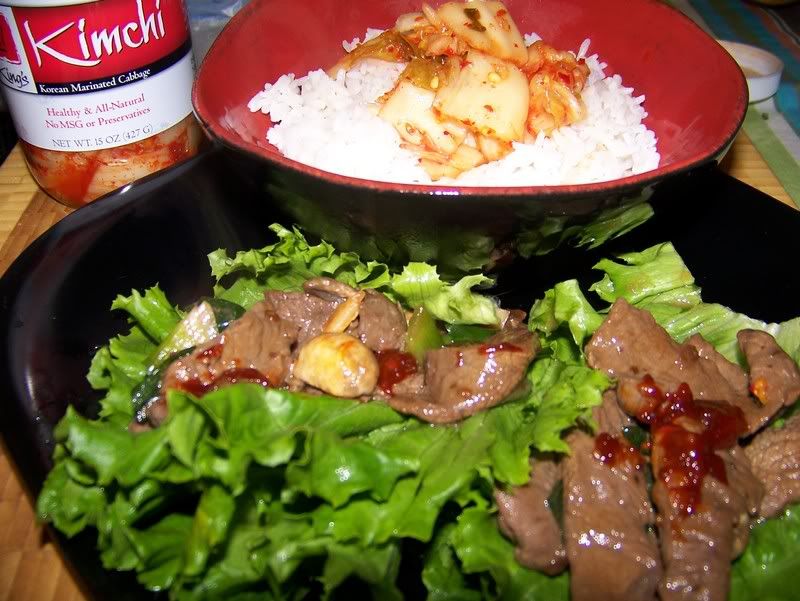
If you have an Asian Market in your city, take a visit, and pick up some Kimchi, pickled Diakon Radish, and Gochujang - a spicy chili paste. (And, look for a product called "Lux" - the body wash is amazing!!!) You will then be on your way to absolute deliciousness!
KOREAN BULGOGI
1 lb top sirloin
3 tbsp soy sauce
1 tbsp sesame oil
1 garlic clove, minced
1 tsp white sugar
salt and pepper
3 green onions, sliced on an angle
1/2 cup sliced white button mushrooms
lettuce of your choice
prepared rice
The night before: Slice beef super thin. (Hint - stick the beef into the freezer until the meat just begins to freeze - it will make slicing it a lot easier!) Place beef, green onions and mushrooms into a zip-locked plastic bag. In a small bowl, combine soy sauce, sesame oil, garlic, sugar and salt and pepper. Pour into bag. Refridgerate over night, turning bag once halfway through.
Day of: Make rice. Preheat an indoor grill pan. Once pan is hot, place marinated beef and vegetables on grill and cook until beef is no longer pink. Remove from heat.
To eat: Wrap meat, vegetables and rice inside a lettuce leaf. Top with a little Gochujang. Enjoy!
Wednesday, March 28, 2007
Pan Seared Tilapia with Pesto and Tomatoes
As Spring approaches, I find myself wanting to plan menus that are a little lighter - and white fish, namely Tilapia, is perfect for that. I've mentioned it in the past, and it's worth repeating...fish/shellfish is not my favorite thing. As a child I hated it. I would completely turn my nose up at the mention of seafood. My mother used to make haddock, which many people find appealing - but I find disgusting. That lingering smell along would cause me to dry heave. When I "discovered" Tilapia, I was hooked. It's a fish that I can get behind!
When cooking tilapia, you will find that not only is it extremely delicate, but there is virtually no smell what-so-ever. It doesn't matter which application you cook it in (the oven, on the stovetop, in foil on the grill) - most of the time, the people in your household will not be able to tell that you are even cooking fish until it shows up on your plate. (Not at all like the above mentioned haddock, which stinks your entire house up as soon as you open the butcher paper it comes in!)
The produce at the grocery store also makes a huge turn around at this time. Tomatoes become sweeter - herbs more vibrant in color and flavor...instantly my brain is drawn to vegetables and fruits even more than before. When you can smell the tomatoes as soon as you walk in the door, you just know that they will be finding a home in your grocery cart, even if they were not originally on your shopping list.
PAN SEARED TILAPIA with PARSELY PESTO and TOMATO
4 tilapia filets (fresh or frozen - defrost if frozen)
3 roma tomatoes, seeded and diced
2 tbsp olive oil
1 tbsp butter
pesto (recipe to follow)
1 tbsp fresh parsley, roughly chopped (can substitute BASIL)
salt and pepper, to taste
Dice up tomatoes into a small bowl. Add in 1 tbsp of roughly chopped parsley. Season with salt and pepper and a drizzle (1 tbsp) of olive oil. Stir to combine. Set aside.
In a large skillet, heat 1 tbsp oil and butter together until sizzling. Season fish with salt and pepper, and place each filet in skillet - seasoned side down. Season second side. Cook fish approximately 3-4 minutes on each side, or until flesh turns a nice golden brown.
To plate: Lay some of the tomato mixture onto your dish. Carefully position a piece of fish over the tomatoes, followed by 1-2 tbsp pesto. Garnish with fresh herbs, or a couple lemon wedges. I chose to serve mine along with a side of good old mashed potatoes!

There is absolutely nothing wrong with purchasing store made pesto (found usually in the deli section), but I prefer to make my own - this way I can control the consistancy and the ingredients. Plus, it's easy - and leftovers find their way into my lunch bag on top of pasta or sandwiches. You can make "pesto" with any herb you like. I was planning on using parsley from the start, since it is always available at my market and it's cheap - but "traditional" pesto calls for the use of basil. I've also made it with baby spinach, and cilantro. Cooking is all about experimentation! Let loose in the kitchen, baby!
PESTO
1 big bunch of the herb of your choice
juice of one lemon
olive oil
1 raw garlic clove
salt and pepper
1/2 cup of pine nuts (I've also used walnuts with great success!)
3 tbsp freshly grated parmesan cheese
Add all of the ingredients - minus the oil - into a food proccessor, and pulse to combine. Turn proccessor on completely, and stream in olive oil until you achieve the consistancy you desire. (I end up using about 1/2 cup of oil.) Adjust as needed. Store in a sealed container in the refridgerator for up to a week, or empty into an ice cube tray and freeze! Makes approximately 1 cup of pesto.

Enjoy the tastes of Spring!
When cooking tilapia, you will find that not only is it extremely delicate, but there is virtually no smell what-so-ever. It doesn't matter which application you cook it in (the oven, on the stovetop, in foil on the grill) - most of the time, the people in your household will not be able to tell that you are even cooking fish until it shows up on your plate. (Not at all like the above mentioned haddock, which stinks your entire house up as soon as you open the butcher paper it comes in!)
The produce at the grocery store also makes a huge turn around at this time. Tomatoes become sweeter - herbs more vibrant in color and flavor...instantly my brain is drawn to vegetables and fruits even more than before. When you can smell the tomatoes as soon as you walk in the door, you just know that they will be finding a home in your grocery cart, even if they were not originally on your shopping list.
PAN SEARED TILAPIA with PARSELY PESTO and TOMATO
4 tilapia filets (fresh or frozen - defrost if frozen)
3 roma tomatoes, seeded and diced
2 tbsp olive oil
1 tbsp butter
pesto (recipe to follow)
1 tbsp fresh parsley, roughly chopped (can substitute BASIL)
salt and pepper, to taste
Dice up tomatoes into a small bowl. Add in 1 tbsp of roughly chopped parsley. Season with salt and pepper and a drizzle (1 tbsp) of olive oil. Stir to combine. Set aside.
In a large skillet, heat 1 tbsp oil and butter together until sizzling. Season fish with salt and pepper, and place each filet in skillet - seasoned side down. Season second side. Cook fish approximately 3-4 minutes on each side, or until flesh turns a nice golden brown.
To plate: Lay some of the tomato mixture onto your dish. Carefully position a piece of fish over the tomatoes, followed by 1-2 tbsp pesto. Garnish with fresh herbs, or a couple lemon wedges. I chose to serve mine along with a side of good old mashed potatoes!
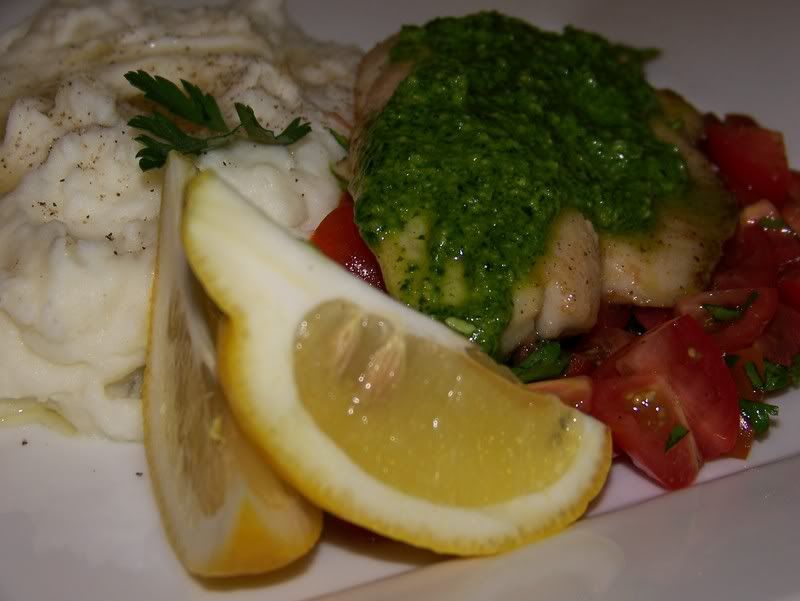
There is absolutely nothing wrong with purchasing store made pesto (found usually in the deli section), but I prefer to make my own - this way I can control the consistancy and the ingredients. Plus, it's easy - and leftovers find their way into my lunch bag on top of pasta or sandwiches. You can make "pesto" with any herb you like. I was planning on using parsley from the start, since it is always available at my market and it's cheap - but "traditional" pesto calls for the use of basil. I've also made it with baby spinach, and cilantro. Cooking is all about experimentation! Let loose in the kitchen, baby!
PESTO
1 big bunch of the herb of your choice
juice of one lemon
olive oil
1 raw garlic clove
salt and pepper
1/2 cup of pine nuts (I've also used walnuts with great success!)
3 tbsp freshly grated parmesan cheese
Add all of the ingredients - minus the oil - into a food proccessor, and pulse to combine. Turn proccessor on completely, and stream in olive oil until you achieve the consistancy you desire. (I end up using about 1/2 cup of oil.) Adjust as needed. Store in a sealed container in the refridgerator for up to a week, or empty into an ice cube tray and freeze! Makes approximately 1 cup of pesto.
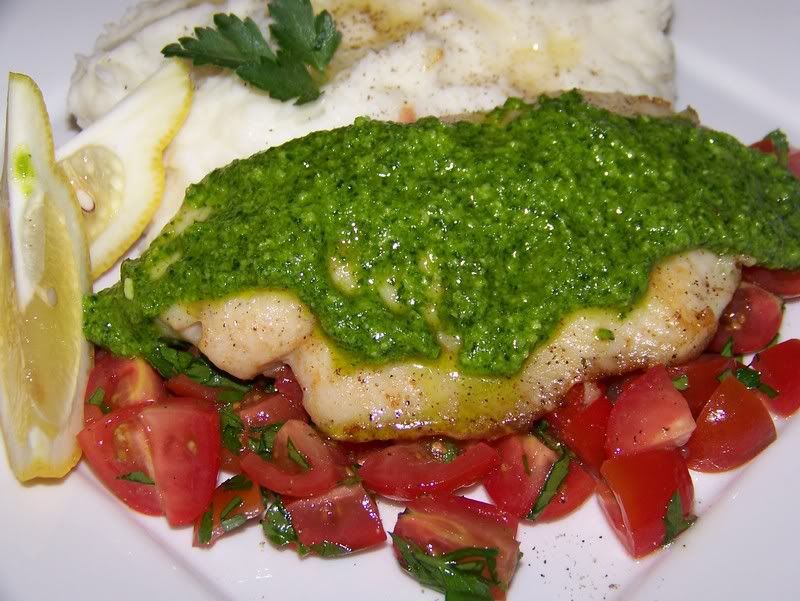
Enjoy the tastes of Spring!
Monday, March 26, 2007
Weekly Menu Planning
Monday - Swedish Meatballs over Egg Noodles
Tuesday - Pan Seared Talapia with Pesto and Tomatoes
Wednesday - Pork Loin in the Crockpot (I haven't decided which recipe quite yet!)
Thursday - Bulgogi
Friday - work event (nothing planned)
Saturday - Curried Corn Bisque - in a bread bowl
Yummy week, in my humble opinion!
Tuesday - Pan Seared Talapia with Pesto and Tomatoes
Wednesday - Pork Loin in the Crockpot (I haven't decided which recipe quite yet!)
Thursday - Bulgogi
Friday - work event (nothing planned)
Saturday - Curried Corn Bisque - in a bread bowl
Yummy week, in my humble opinion!
Subscribe to:
Posts (Atom)