Friday, March 30, 2007

Bulgogi

Korean food anyone? Growing up I was a meat and potatoes kind of girl. We just didn't do ethnic food of any kind (even Chinese take out) until I was well into high school - and even then, it was basic Chicken and Broccoli. It wasn't until I started dating Nathan, who is 1/2 Korean (his mom), that a whole new world opened up to me.

And, he reminds me every time we eat anything remotely "un-american."

For a while I have been wanting to make Bulgogi (Korean BBQ Beef) at home. I always thought it was too complicated...too time consuming. It's not - and what makes it even easier, is that you can do most of the prep work the night before. (I tastes better that way anyway!) The most complicated part of the meal is making the rice!


If you have an Asian Market in your city, take a visit, and pick up some Kimchi, pickled Diakon Radish, and Gochujang - a spicy chili paste. (And, look for a product called "Lux" - the body wash is amazing!!!) You will then be on your way to absolute deliciousness!

KOREAN BULGOGI

1 lb top sirloin
3 tbsp soy sauce
1 tbsp sesame oil
1 garlic clove, minced
1 tsp white sugar
salt and pepper
3 green onions, sliced on an angle
1/2 cup sliced white button mushrooms
lettuce of your choice
prepared rice

The night before: Slice beef super thin. (Hint - stick the beef into the freezer until the meat just begins to freeze - it will make slicing it a lot easier!) Place beef, green onions and mushrooms into a zip-locked plastic bag. In a small bowl, combine soy sauce, sesame oil, garlic, sugar and salt and pepper. Pour into bag. Refridgerate over night, turning bag once halfway through.

Day of: Make rice. Preheat an indoor grill pan. Once pan is hot, place marinated beef and vegetables on grill and cook until beef is no longer pink. Remove from heat.

To eat: Wrap meat, vegetables and rice inside a lettuce leaf. Top with a little Gochujang. Enjoy!

Wednesday, March 28, 2007

Pan Seared Tilapia with Pesto and Tomatoes

As Spring approaches, I find myself wanting to plan menus that are a little lighter - and white fish, namely Tilapia, is perfect for that. I've mentioned it in the past, and it's worth repeating...fish/shellfish is not my favorite thing. As a child I hated it. I would completely turn my nose up at the mention of seafood. My mother used to make haddock, which many people find appealing - but I find disgusting. That lingering smell along would cause me to dry heave. When I "discovered" Tilapia, I was hooked. It's a fish that I can get behind!

When cooking tilapia, you will find that not only is it extremely delicate, but there is virtually no smell what-so-ever. It doesn't matter which application you cook it in (the oven, on the stovetop, in foil on the grill) - most of the time, the people in your household will not be able to tell that you are even cooking fish until it shows up on your plate. (Not at all like the above mentioned haddock, which stinks your entire house up as soon as you open the butcher paper it comes in!)

The produce at the grocery store also makes a huge turn around at this time. Tomatoes become sweeter - herbs more vibrant in color and flavor...instantly my brain is drawn to vegetables and fruits even more than before. When you can smell the tomatoes as soon as you walk in the door, you just know that they will be finding a home in your grocery cart, even if they were not originally on your shopping list.

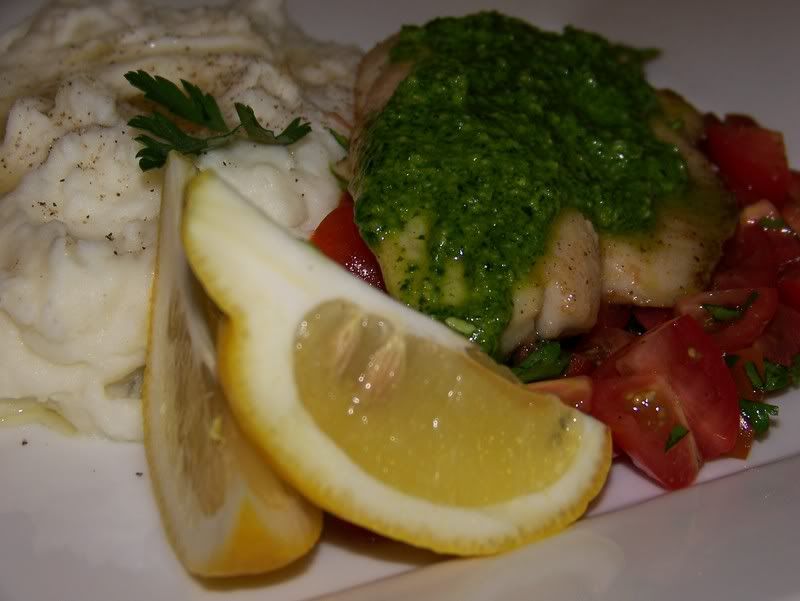
PAN SEARED TILAPIA with PARSELY PESTO and TOMATO

4 tilapia filets (fresh or frozen - defrost if frozen)
3 roma tomatoes, seeded and diced
2 tbsp olive oil
1 tbsp butter
pesto (recipe to follow)
1 tbsp fresh parsley, roughly chopped (can substitute BASIL)
salt and pepper, to taste

Dice up tomatoes into a small bowl. Add in 1 tbsp of roughly chopped parsley. Season with salt and pepper and a drizzle (1 tbsp) of olive oil. Stir to combine. Set aside.

In a large skillet, heat 1 tbsp oil and butter together until sizzling. Season fish with salt and pepper, and place each filet in skillet - seasoned side down. Season second side. Cook fish approximately 3-4 minutes on each side, or until flesh turns a nice golden brown.

To plate: Lay some of the tomato mixture onto your dish. Carefully position a piece of fish over the tomatoes, followed by 1-2 tbsp pesto. Garnish with fresh herbs, or a couple lemon wedges. I chose to serve mine along with a side of good old mashed potatoes!


There is absolutely nothing wrong with purchasing store made pesto (found usually in the deli section), but I prefer to make my own - this way I can control the consistancy and the ingredients. Plus, it's easy - and leftovers find their way into my lunch bag on top of pasta or sandwiches. You can make "pesto" with any herb you like. I was planning on using parsley from the start, since it is always available at my market and it's cheap - but "traditional" pesto calls for the use of basil. I've also made it with baby spinach, and cilantro. Cooking is all about experimentation! Let loose in the kitchen, baby!

PESTO

1 big bunch of the herb of your choice

juice of one lemon
olive oil
1 raw garlic clove
salt and pepper
1/2 cup of pine nuts (I've also used walnuts with great success!)
3 tbsp freshly grated parmesan cheese


Add all of the ingredients - minus the oil - into a food proccessor, and pulse to combine. Turn proccessor on completely, and stream in olive oil until you achieve the consistancy you desire. (I end up using about 1/2 cup of oil.) Adjust as needed. Store in a sealed container in the refridgerator for up to a week, or empty into an ice cube tray and freeze! Makes approximately 1 cup of pesto.


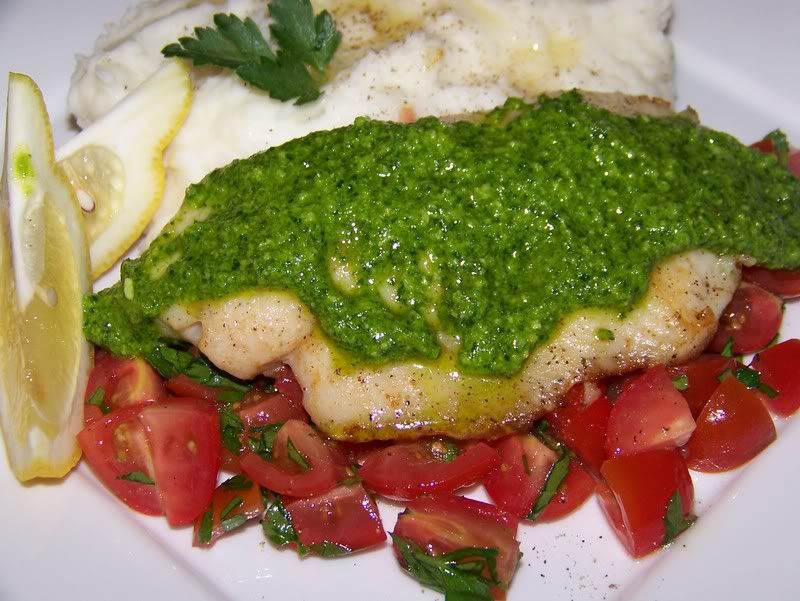
Enjoy the tastes of Spring!

Monday, March 26, 2007

Weekly Menu Planning

Monday - Swedish Meatballs over Egg Noodles
Tuesday - Pan Seared Talapia with Pesto and Tomatoes
Wednesday - Pork Loin in the Crockpot (I haven't decided which recipe quite yet!)
Thursday - Bulgogi
Friday - work event (nothing planned)
Saturday - Curried Corn Bisque - in a bread bowl

Yummy week, in my humble opinion!

Bobby Flay's Mac and Cheese

Holy Goodness Gracious!

This Macaroni and Cheese recipe is to die for.

Unfortunately, Food Netork (.) com crashes on me every single time I try to find the link to add to this blog - so if you are interested, go here and do a search for "Mac and Cheese Carbonara." You will not be disappointed. There was a reason Bobby Flay won that particular Throwdown.

Nathan, who came home late and had to reheat his portion, acutally said "Man! This is the best fucking macaroni and cheese I have ever tasted." Yes, he said the F word. Loudly too. Leftovers rocked. In fact, I've had this mac and cheese for lunch 3 straight days in a row, and it never got old. I did omit the pork (panchetta?), because I accidently forgot to add it to my grocery list and was too darn lazy to go back to retrieve it.


Look how creamy! And, those herbs really make a huge difference...


Wednesday, March 21, 2007

"Springtime" Quiche

It's officially Spring! Time to phase out all of the hot, tummy warming soups - and add even more fresh vegetables to your diet. I saw this recipe for Springtime Quiche on www.landolakes.com - and decided that this was the perfect dish to help ring in the change of seasons. The recipe is pretty fool proof, if you use a store bought crust, like I did (shameful, I know!)...and it would make a fabulous Mother's Day brunch item! (hint, hint)

SPRINGTIME QUICHE

1 premade pie crust, thawed and rolled out slightly on a well floured surface
8 slices of crispy bacon, cut into 1 inch pieces and drained on a paper towel
1 bunch of fresh asparagus, washed and cut into 1 inch pieces
4 eggs
1 1/2 cups of Half & Half
salt and pepper, to taste
2 cups shredded cheddar cheese

Preheat oven to 375 degrees.

Whisk together the eggs, salt and pepper and Half & Half in a small bowl until well combined. Add a handful of shredded chedder cheese to the mixture and set aside.In an ungreased pie dish, place your premade pie crust, crimping the edges as you go along. (You can certainly make your own...I didn't have the patience - and happened to have the crust in the freezer already - so I was golden!) Sprinkle the rest of the cheese onto the crust, followed by the bacon and asparagus. Pour your egg mixture on top and shimmy the pie plate a little to even distribute. If you wish, you can use a little egg wash (1 egg and 1 tbsp water mixed up) on the crust, to give it a pretty sheen.

Bake for 45-50 minutes, or until center is set. Let quiche rest 10 minutes before serving, or it will be simply impossible to take out of the pie plate neatly and you will burn the roof of your mouth!
The orginial recipe said that you should leave the asparagus whole, creating a little pattern out of the stalks...I was going to do that, then remembered the last time it made a huge mess when it came time to eat! The asparagus didn't cut easily. So, chopping it up into bite sized pieces made better sense to me - but you can certainly do as you please.
How can you go wrong when BACON is one of the main ingredients?!

Monday, March 19, 2007

Food and other thoughts in my head

First things first - let's commit to some dinners!

Monday -Broiled Scallops and Shrimp over Mango Majo and Wild Rice
Tuesday - Springtime Quiche aka "girlie food"
Wednesday - Baked Linguine Pie with Sausage
Thursday - Mac and Cheese...prepped the day ahead and ready for Nate to heat up in the oven. (I have a work event)
Friday - Pizza!
Saturday - Leftovers. (Another work event)

I am so ready for this month to be over. It's been full of nightime work events - that I don't get paid for! - and fast and furious dinners that require no thought or brain power.

I have to admit, that Bobby Flay once again tickled my taste buds with his Mac and Cheese Throwdown! I literally had to wipe my mouth with the back of my hand after seeing his dish come out of the oven. I'm totally going to test his recipe this week and blog it!

Last night I caught the biography of Miss Rachael Ray on Food Network. Even though I am not a fan of her, I do watch 30 Minute Meals from time to time...and have tried many of her recipes, with good results. Watching her drive and determination actually gave me some insight into that giggle monster...I actually have a new found respect for her. I never knew that she kicked ass and took names to get to where she is currently at! Now, I'm not saying I lurve her or anything...so don't put words in my mouth! I still think she's looney tunes! (Like most of my friends.) Like Rachael, "I'm not champagne. I'm beer. Straight out of the bottle."

Edited to add: St Patrick's Day dinner was fab-u-lous! I splurged on the beef and got a piece that was all meat with great marbeling - yet little fat - that boiled up to tender perfection. I boiled it with a lovely head of cabbage, and served some roasted carrots and sour cream smashed potatoes on the side. The carrots were nicely caramelized and had the best flavor. I also whipped up a loaf of Irish Soda Bread - this time made with dried cranberries. So good!

Thursday, March 15, 2007

Pork Chops with Apricot Scented Onions

Do you know how long it takes to sweat onions?! A really long time, if you do it right - which, apparently I have not done correctly in the past.

I wanted something a little different, because pork has a tendency to become a bit boring over time. I wanted something sweat and rich - but not heavy...in other words, I wanted a dish that would not feel like a brick in my stomach.

I ended up with this:


PORK CHOPS with APRICOT SCENTED ONIONS

3-4 boneless center cut pork chops, about 1/2'' thick
2 sweet onions, finely sliced
2 tbsp olive oil
1/8 tsp salt
1/4 cup apricot preserves
salt and pepper, to taste

Preheat oven to 350 degrees.

Heat 1 tbsp oil in a large skillet over medium low heat. Add the onions, and stir in oil to coat. Turn the heat down to low, and let "sweat" until the onions caramelize. (This will take a good 45-50 minutes, at least! So, plan accordingly.)

Meanwhile, season pork with salt and pepper, on both sides. In an oven safe skillet, heat up 1 tbsp olive oil, and cook pork over medium high heat about 3-4 minutes on each side. Place entire skillet in oven and cook an additional 25 minutes, or until fully cooked through.

Right before service, add apricot preserves to your caramelized onions, and heat through, stirring until preserves "melt" into the onions. Serve onion mixture on top of the cooked pork, and enjoy!


I finished the dish off with some couscous (multicolored!) and some brussel sprouts.

Compliments sprang forth from Nate, who told me that this pork dinner was a keeper. I agree!

Monday, March 12, 2007

Bribes

Every once in a while, a bribe is called for. This weekend (before I came down with the dreaded sickies), I decided to take the issues into my own hands - and made some awesome cookies for the boyfriend to drool over.

Kat: Will you please fix the back door?
Nate: Hun, I am awfully busy.
Kat: I'll make you cookies if you do it.
Nate: What kind?
Kat: You choose...chocolate chip or oatmeal raisin?
Nate: Oatmeal raisin! They're healthier.

OK - oatmeal in a cookie does not make it healthy. We all know that - but for one moment can we just use his logic as gospel? 'Cause that would sure make life a whole lot tastier!

I searched all over for my great grandmother's recipe, and I could not find it. But, I couldn't give up, because the back door needed fixing badly, so I took out the oatmeal box and peeled off the lid. Horray! A recipe!

So, let me give Quaker some props. The cookies were nice and moist - just as I like them. I still like my recipe better (because it has molasses in it!), but these are a very close second.

QUAKER'S VANISHING OATMEAL RAISIN COOKIES

1 cup (2 sticks) butter, softened
1 cup firmly packed brown sugar
1/2 cup granulated sugar
2 eggs
1 tsp vanilla
1 1/2 cups flour
1 tsp baking soda
1 tsp cinnamon
1/2 tsp salt
3 cups old fashioned oats
1 cup raisins

Preheat oven to 350 degrees.

Beat together butter and sugars until creamy. Add eggs and vanilla, beating well to incorporate. Add flour, baking soda, cinnamon and salt. Mix well. Stir in oats and raisins.

Drop by rounded tablespoonfuls onto a silpat lined baking sheet. Bake 10-12 minutes or until the edges are a golden brown. Let cook for 1 minute on baking sheet, before transferring to a wire rack to completely cool.


But, you know what? After all that baking and snacking...the door was never fixed! I just may have to bust out a cheesecake or something. (After all, according to Nate, cheesecake is healthy, because it has cheese in it.)

Wednesday, March 07, 2007

Gotta Try It!

I've been a faithful user of another brand (which I will not name), since I have lived on my own - and the other day at the market, it was all sold out. So, I grabbed a bottle of Dawn with Bleach Alternative, the Fresh Rapids scent. I used it that night, and I can not believe the cleaning power of this stuff! I don't want to say that it made washing dishes enjoyable, but it kinda did. (And, for me - that says a lot!) The stuck on food and grease just slid off with very little effort, and everything came out squeeky clean.

I've made this my new dishwashing liquid.

What does everyone else use?

Lobster and Shrimp Bisque

Oh yum! And, I don't even like lobster! The original recipe is from Food Network's Paula Deen, (I'd add a link, if Food Network didn't crash on me every time I do a simple search) but in my usual fashion, I added and subtracted a couple of ingredients to make it all mine! The bisque was really creamy and full of flavor - but not fishy at all. The lobster and shrimp were both so tender...it was like heaven in a bowl.

When I make it again, I will probably serve it as a soup course, instead of an entree, because although it is very rich, it isn't very filling. (I managed it make it through the night without snacking, but Nate couldn't help eating out the rest of the refridgerator!) It is a bit on the expensive side - due to the lobster - but you can certainly omit that ingredient and double up on the shrimp, or add some other kind of white seafood (scallops, cod).

LOBSTER AND SHRIMP BISQUE
2-3 large lobster tails, pre-cooked and cut into bite sized pieces
1 lb medium shrimp, tails removed
6 cups of chicken stock
1 cup of heavy cream
2 celery stalks, halved and sliced
2 carrots, halved and sliced
1 onion, chopped
2 garlic cloves, finely minced
4 tbsp butter
4 tbsp flour
1 bay leaf
2 tbsp fresh thyme (or 1 tsp dried)
salt and pepper, to taste

In a large stock pot, melt butter. Add onion, garlic, carrot and celery and cook until veggies are tender. Immediately add flour, stirring to combine. Slowly add chicken stock and bring to a boil, stirring often. Once boiling, add one dried bay leaf to the liquid, followed by the seafood. Let boil further until soup reduces some.
Turn the heat down to simmer, and sprinkle in the thyme, stirring to incorporate. Remove bay leaf and discard. Before service add 1 cup of heavy cream to complete the soup.

A nice loaf of crusty Italian Bread is a must for getting all of that wonderful broth, and much more civilized than licking the bowl itself!
There's lots of lobster and shrimp hiding in that soup!
Hey shrimpy, shrimpy - where are you?!

Tuesday, March 06, 2007

Oh Lasagne!

I did make the Sausage Lasagne last night, and I have to tell you - it was yummy and well worth the added effort. Unfortunately, Nate and I were both super hungry by the time it was done that we didn't let the dish "set" which caused our plates to look like a crime scene...so, no picture of my efforts.

I have fond memories of my Meme's lasagne growing up. Instead of browned ground beef or sausage, she would make these mini meatballs. I would (very carefully) pick out all of the meatballs from my serving, and eat those first because they were just so cute! When I have a lot of time on my hands, I make it the same way - - it just becomes all the more special and warms me from within.

KAT'S CLASSIC SAUSAGE LASAGNE

Barilla (no pre-cook needed) lasagne noodles* - I used the flat version
2 jars of your favorite marinara sauce
1 cup of bechamel sauce (recipe to follow)
1 medium onion, chopped
2 cloves of garlic, finely minced
1 lb ground sweet italian sausage
1 tbsp olive oil
salt and pepper
1 tbsp parsley
1/2 cup parmesan cheese
4 cups shredded mozzarella cheese
1 container of ricotta cheese
1 egg, slightly beaten

Preheat oven to 375 degrees.

Prepare Bechamel: Melt 2 tbsp of butter in a large skillet. Add 2 tbsp of flour, and stir to combine. Slowly add 1 1/2 - 2 cups of milk and stir. Let thicken (until mixture yields approximately 1 cup of bechamel). Add a touch of freshly grated nutmeg, and salt and pepper to taste.

In another skillet, heat olive oil. Add sausage, breaking up the meat with a wooden spoon. Once sausage is half-way cooked, add onion and garlic and finish cooking until onion is translucent and sausage is browned. Remove from heat.

In a medium bowl, combine ricotta, beaten egg, parmesan cheese, salt and pepper and parlsey. Mix thoroughly to combine. In a large bowl, combine marinara sauce and freshly made bechamel sauce.

Assembly: Place approximately 1 cup of sauce mixture into the bottom of a 9x13x2 inch baking dish. Place none-cook noodles in a single layer along the bottom. Layer cheese mixture then sausage mixture, then top with more sauce. Finally add a good helping of shredded mozzarella cheese. Continue entire layering process until you reach the lip of the baking dish, finishing with the final layer of noodles, sauce and mozzarella cheese. (I got about 3 layers completed.) Cover whole dish with foil, and place on a baking sheet (seriously - don't skip this part...it's "insurance" for your oven) in the middle of your oven. Bake for 50-60 minutes. Let cool 10 minutes before serving.

Serves an army. (I plan on freezing the rest, by serving size.)

*I've always used generic brand pasta - but many of my foodie friends encouraged me to try Barilla, since they claim that it is the best dried pasta available. I finally caved in and bought it, and they were right. It cooked up perfectly.

Monday, March 05, 2007

Weekly Menu Planning

I have no idea if my menus will remain even remotely close, since March pretty much sucks at work - I have so many late nights and work events as we juggle all of the celebrations of "the American Music Festival." But, I will still plan, and cross my fingers in the meantime.

Monday - Sausage Lasagna
Tuesday - Tacos
Wednesday - Lobster and Shrimp Bisque
Thursday - Apricot Honey Grilled Chicken (only not grilled for us)
Friday - work event
Saturday - eating out

Alternate menu: Ramen noodles and Kimchee

Thursday, March 01, 2007

Rigatoni with Acron Squash

I really like the idea of squash and pasta together - sometimes it works, sometimes it doesn't. Last night, it worked! (Thankfully - although I had to hear moans and groans of dismay from Nathan as he walked by the stove.)

I think it's the stringy texture of the acorn squash that I like so much - or the sweetness against the bland pasta. And, the cream...definitely the cream! The dish was fast, easy and hit the spot. The one thing that really pissed me off is that I got so side tracked after dinner, that I forgot to put our leftovers in the refrigerator, so I had nothing to bring today for lunch. Bummer! It would've probably been very good.

RIGATONI WITH ACORN SQUASH

1 lb rigatoni
1 medium acorn squash, peeled and cut into small cubes
2 tbsp butter
1 small onion, finely minced
2 cups chicken stock
1 cup heavy cream
1/4 tsp grated nutmeg
1 tbsp fresh thyme, or 1/2 tsp dried thyme
1/4 cup brown sugar

Prepare pasta as directed.

In a large skillet, melt butter over medium high heat. Once butter is melted, add onions and cook until translucent. Add brown sugar and cook until dissolved, stirring constantly. Then, add chicken stock, squash, nutmeg and thyme. Bring to a boil, and cook until squash become tender. Finish off with heavy cream. Drain pasta into squash mixture, stir gently (so you don't break up your pasta!) and serve.

I add a bed of sauted spinach (hooray for germ free spinach!) in garlic and olive oil on the side. And, BTW - Nate ate it, and liked it and even had seconds. The punk!