This Sunday will mark the Second-Anual Great Cookie Bake-off. I was going to skip it this year, since I've been feeling under the weather, but my niece pulled out the cute factor and totally tricked me into saying yes. (And, how could I say no and live with myself - I am so *into* children helping out in the kitchen!)
This year I have a new tool that will make cookie making even faster - if it doesn't blow out a fuse to the shared outlet - another KitchenAid mixer that Nathan acquired during one of his clean outs! Now, both kids can make their own batch of cookies at the same time. (God help me!)
On the docket this year: our usual family favorites - Jam Thumbprints, Cream Cheese Cookies, Russian Teacakes, No-Bake Buckeyes, Chocolate Covered Peanut Clusters, Delux Sugar Cookies and Strawberry Cheese Cake Bars. And, what cookie escapade wouldn't be complete without some new recipes to try: Chocolate Mint Wafers (think Girl Scout Thin Mints!) and Petite Lemon Curd Cookies. There may be a couple of tricks up my sleeves as well.
Monday, December 10, 2007

Monday, December 03, 2007
Turkey-day Leftovers - - Swedish Meatballs made healthier
2 people.
18 pound fresh turkey.
4 1/2 hours cooking time.
Leftovers galore = PRICELESS
4 1/2 hours cooking time.
Leftovers galore = PRICELESS
We're not totally glutenous...we planned for an entire week of leftovers when we bought such a large turkey for two people. Not only did we feast on hot open-faced sandwiches, but I also re-purposed some traditional items into entirely new dishes.
, meat
Who says that you need to roast the entire bird all at once? Before our brine experiment, I cut away one of the breasts and placed it in the fridge for the next day. Why? So that I could use the lean meat to make some homemade turkey meatballs! I just ground the meat myself in my food processor.
(Not Really) SWEDISH MEATBALLS
2 lbs ground turkey meat to substitute the ground beef in my meatball recipe.
1 medium onion, diced
1 garlic clove, finely minced
1 tsp olive oil
2 cups half & half (the original recipe called for cream!)
1 cup reduced fat sour cream
1 (10 3/4 oz) can condensed cream of chicken, 99% fat free
black pepper
1 package of uncooked dried egg noodles
chopped fresh parsley, for garnish if desired
Follow meatball recipe in the link provided, substituting 2 lbs ground turkey in place of the ground beef, or make you own meatballs using your recipe...OR purchase a package of pre-made meatballs!
In a large skillet, sweat onions and garlic in olive oil over medium-high heat. Add the half & half, sour cream and chicken soup, stirring to combine. Add already cooked meatballs and continue to cook in skillet for 20-25 minutes, or until sauce begins to thicken. Meanwhile, prepare egg noodles as directed on package.
Season meatballs and sauce with a few grinds of fresh black pepper, and garnish with chopped parsley. Serve over eggs noodles.
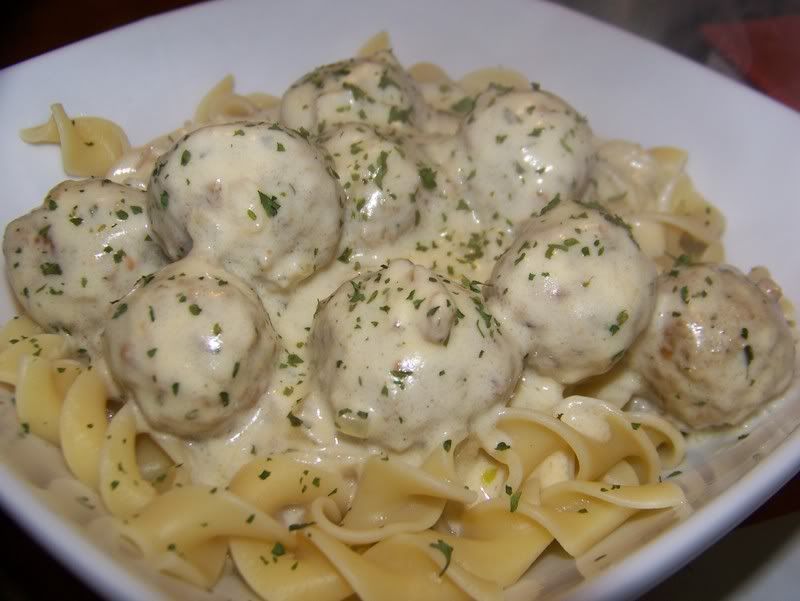
This dish satisfies that creamy texture I was craving - but still remained on the healthier side, since I used fat-free or low-fat ingredients and lean turkey breast meat in the meatballs. Be forewarned that the turkey meatballs will have a slightly different texture than beef or pork meatballs traditionally used in Swedish Meatballs. Plus, it was totally different than the other turkey meals we had after Thanksgiving!!! It was a total curve ball!
Sunday, December 02, 2007
Dinner is served - a little late...
I hope everyone who reads this blog had a wonderfully chaotic Thanksgiving!
This year, Nathan and I decided that we wanted to keep everything low-key and instead of celebrating with family we made a tasty Thanksgiving meal for the two of us. We cooked (and ate) way too much food, checked out all of the Black Friday circulars, napped, played with the puppies and went to bed early. It was my idea of heaven!
The chefs over at Food TV have been telling us to brine our turkeys for years now - to ensure a moist, flavorful bird. Since we don't mind being Guinea pigs, I said "What the hell, let's do it!"
POULTRY BRINE
1 gallon of boiling water
2 cups kosher salt
2 cups honey
1 (5lb.) bag of ice
cooler, or other large vessel
raw turkey, cleaned with giblets removed
Once gallon of water is boiling, dissolve both salt and honey. Let cool slightly. Position turkey in container so the cavity is within your reach. Empty 1/2 of the bag of ice...carefully pour brine liquid over turkey (add additional water to fully cover bird, if needed) and follow up with remaining ice. Make sure that the liquid is in the cavity as well, or you will have a floating turkey. Cover and place in a cool, dry place and leave at least 12 hours or overnight.
Ready to roast: Drain liquid from container and remove bird. Thoroughly rinse bird removing any brine residue. Set in roasting pan, and pat dry with paper towels. Prepare bird as desired.
I like to think the brining worked, since we *kinda* took positioned our turkey a little too close to the top of the oven, thus giving it a little more color than we hoped. The breast meat still came out super moist and succulent. I'm pretty sure that if we didn't do the brine, it would've been as dry as sandpaper. Everyone has been asking "Is the meat salty?" and the short answer is NO. I don't really understand all of the science behind it, so if you are like me, you just gotta take my word for it. The brining process is a bit of a pain in the ass, to put it bluntly, so we may not do it again. I've read some bloggers who dry brined their bird with good success, so there's a possibility we may take that route next time.
 The dogs waited on the couch patiently as we dressed the table.

Unfortunately, the turkey did not make a formal appearance at our table, since the table was a little small, and we had so much other food! It was a tad disappointing for me, since I purchased a beautiful new serving platter to place it on, and fresh herbs as a "bed" to ground the turkey and keep it in place. Oh well.
Leftover recipes to follow!
This year, Nathan and I decided that we wanted to keep everything low-key and instead of celebrating with family we made a tasty Thanksgiving meal for the two of us. We cooked (and ate) way too much food, checked out all of the Black Friday circulars, napped, played with the puppies and went to bed early. It was my idea of heaven!
The chefs over at Food TV have been telling us to brine our turkeys for years now - to ensure a moist, flavorful bird. Since we don't mind being Guinea pigs, I said "What the hell, let's do it!"
POULTRY BRINE
1 gallon of boiling water
2 cups kosher salt
2 cups honey
1 (5lb.) bag of ice
cooler, or other large vessel
raw turkey, cleaned with giblets removed
Once gallon of water is boiling, dissolve both salt and honey. Let cool slightly. Position turkey in container so the cavity is within your reach. Empty 1/2 of the bag of ice...carefully pour brine liquid over turkey (add additional water to fully cover bird, if needed) and follow up with remaining ice. Make sure that the liquid is in the cavity as well, or you will have a floating turkey. Cover and place in a cool, dry place and leave at least 12 hours or overnight.
Ready to roast: Drain liquid from container and remove bird. Thoroughly rinse bird removing any brine residue. Set in roasting pan, and pat dry with paper towels. Prepare bird as desired.
I like to think the brining worked, since we *kinda* took positioned our turkey a little too close to the top of the oven, thus giving it a little more color than we hoped. The breast meat still came out super moist and succulent. I'm pretty sure that if we didn't do the brine, it would've been as dry as sandpaper. Everyone has been asking "Is the meat salty?" and the short answer is NO. I don't really understand all of the science behind it, so if you are like me, you just gotta take my word for it. The brining process is a bit of a pain in the ass, to put it bluntly, so we may not do it again. I've read some bloggers who dry brined their bird with good success, so there's a possibility we may take that route next time.
The dogs waited on the couch patiently as we dressed the table.Unfortunately, the turkey did not make a formal appearance at our table, since the table was a little small, and we had so much other food! It was a tad disappointing for me, since I purchased a beautiful new serving platter to place it on, and fresh herbs as a "bed" to ground the turkey and keep it in place. Oh well.
Leftover recipes to follow!
Saturday, November 17, 2007
Thanksgiving menu 2007
I am cooking my very first whole turkey this Thursday, and I am waiting patiently (not!) with eager anticipation. Nathan and I have decided to break away from the family scene this year and have Thanksgiving dinner with just the two of us. We are planning some major leftovers to justify purchasing an 18 lb. bird for only 2 people! (You can see last year's Thanksgiving menu here!)
On the menu this year:
Deviled Eggs
Baked Artichoke Flowers (made with wonton wrappers)
Roasted Turkey with gravy
Mashed Potatoes
Homemade Stuffing
Steamed Broccoli and Baby Carrots
Individual Green Bean Casseroles
Cranberry Fruit Conserve
9-grain rolls
Pumpkin-Ginger Cheesecake Pie with fresh whipped cream
Note to self: pick up a new meat thermometer before Thursday.
Tell me your Thanksgiving menu!!! (Or post a link in the comments so I can check you out!)
On the menu this year:
Deviled Eggs
Baked Artichoke Flowers (made with wonton wrappers)
Roasted Turkey with gravy
Mashed Potatoes
Homemade Stuffing
Steamed Broccoli and Baby Carrots
Individual Green Bean Casseroles
Cranberry Fruit Conserve
9-grain rolls
Pumpkin-Ginger Cheesecake Pie with fresh whipped cream
Note to self: pick up a new meat thermometer before Thursday.
Tell me your Thanksgiving menu!!! (Or post a link in the comments so I can check you out!)
Thursday, November 08, 2007
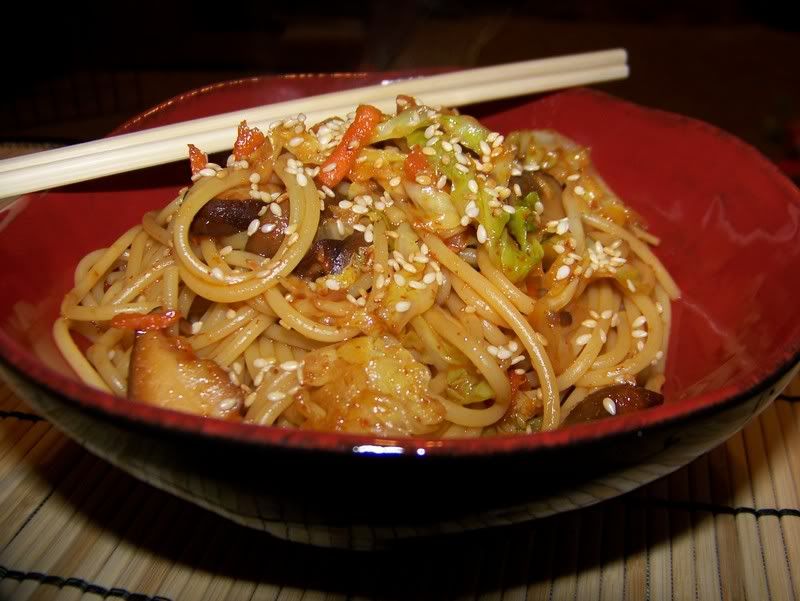
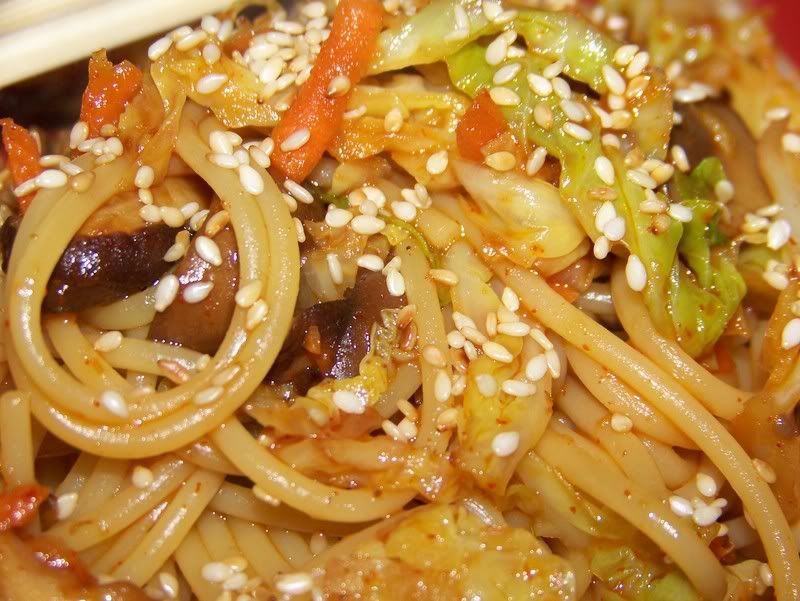
SPICY Noodles with Veggies (out in the open!)
Thanks to Nathan, I love Korean food and all things spicy! He's half Korean, and when we started dating he brought me to a Korean restaraunt, opening up a whole new world of sights and tastes.
I rarely dabble into Korean food at home because it is just not the same, unfortunately. However, I've been holding onto this recipe because I thought it might have some potential...and I was right! It was simple to make, the ingredients were easy to find (with an easy substitution if you don't want to go to an Asian food store) and the meal was really, really tasty. But, he forewarned - it was HOT! Grab a glass of milk, a side of kimchee, some chop sticks and enjoy Korea, without the plane ride and language barrier.
SPICY NOODLES WITH MUSHROOMS AND CABBAGE
I rarely dabble into Korean food at home because it is just not the same, unfortunately. However, I've been holding onto this recipe because I thought it might have some potential...and I was right! It was simple to make, the ingredients were easy to find (with an easy substitution if you don't want to go to an Asian food store) and the meal was really, really tasty. But, he forewarned - it was HOT! Grab a glass of milk, a side of kimchee, some chop sticks and enjoy Korea, without the plane ride and language barrier.
SPICY NOODLES WITH MUSHROOMS AND CABBAGE
1/3 cup water
1/3 cup soy sauce
3 tsp gochujang* 1 tbsp brown sugar
1 lb dried spaghetti (or soba noodles, if you want to keep it truly authentic)
10 oz. of sliced mushrooms - I prefer shiitake for the visual
2 cups shredded cabbage
1 cup shredded carrot
1/2 cup sliced green onions
2 tbsp sesame seeds, toasted until browned
3 tbsp vegetable oil
2 tsp garlic, finely minced
1 inch of fresh ginger, finely minced
In a small bowl combine water, soy sauce, brown sugar and gochujang together until sugar dissolves and set aside. Prepare pasta as directed.
While pasta is cooking, heat oil in a large skillet until hot. Take off direct heat, and add ginger and garlic. (If you keep your ginger in the freezer, like me - be prepared for some "spitting" when the residual water hits the oil!) Return to the heat and immediately follow with the sliced mushrooms, and cook, stirring constantly, until the mushrooms take on a darker brown color, approximately 6 minutes. Add cabbage, carrot and green onion, and saute until veggies become crisp tender. Add sauce and mix thoroughly, until heated through.
Add your noodles to the vegetable mixture and toss to combine. Sprinkle with toasted sesame seeds for a garnish. Serve immediately.
 *Gochujang, a Korean spicy bean paste, is readily available in most supermarkets in the international food aisle. If you can't find it there - check out your local Asian Food Market. It retails between $4.00 - $5.00. You can substitute 3/4 teaspoon Chinese chile paste and reduce the amount of soy sauce to 1/4 cup.
Wednesday, November 07, 2007
C & C Chicken
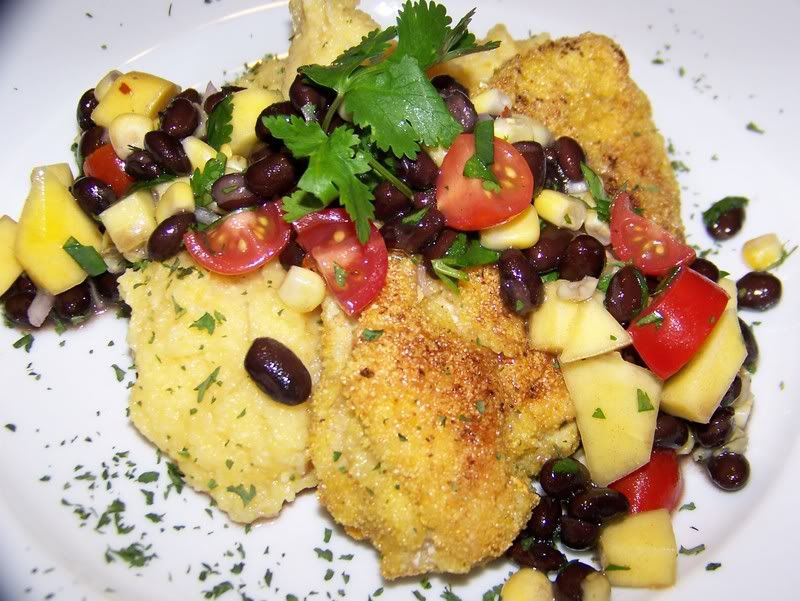
In pouring over various cookbooks and websites, I'm finding that one of the quickest and healthiest ways to add color and flavor to your food is to top it with a homemade salsa. To me, there is nothing better than fresh vegetables and fruits. Salsa is perfect because you are only limited by your own imagination, and what you have in your kitchen. I made mine with the slightest pinch of salt and maybe a tsp of olive oil to bind it all together. I'm totally eating the leftovers for lunch in a lettuce wrap!
CORNMEAL AND CORRIANDER CRUSTED CHICKEN with BLACK BEAN AND MANGO "SALSA"
...for the chicken:
4 slightly pounded boneless, skinless chicken breasts
1/4 cup yellow cornmeal
1 tbsp ground corriander
1 tbsp olive oil
...for the salsa:
1 ripe mango, peeled and diced
1/2 cup corn (if using frozen, thawed)
1 can of black beans, drained and rinsed
1 large shallot, finely diced
1/4 cup cherry or grape tomatoes, diced
2 tbsp finely chopped cilantro (or parsley, if you do not like cilantro)
2 tbsp cider vinegar
1 tsp olive oil
salt and pepper, to taste
Place cornmeal and corriander in a large plate and mix with fingertips. Dredge each chicken breast into the mixture until coated.
Heat oil in a large skillet over medium-high heat. Cook chicken approximately 7 minutes on each side, until completely cooked through, and the crust turns a nice golden brown.
Meanwhile, mix together all salsa ingredients - tasting before adding salt for seasoning.
Serve by spooning the salsa over the chicken!
This meal took about 15 minutes to put together, start to finish - so it is the perfect "on the go" dinner. I also whipped up a batch of polenta made the cornmeal, chicken stock and milk (instead of cream and butter). No salt. And you know what?! It totally didn't even need it - - the salsa was the perfect compliment without being overpowering.
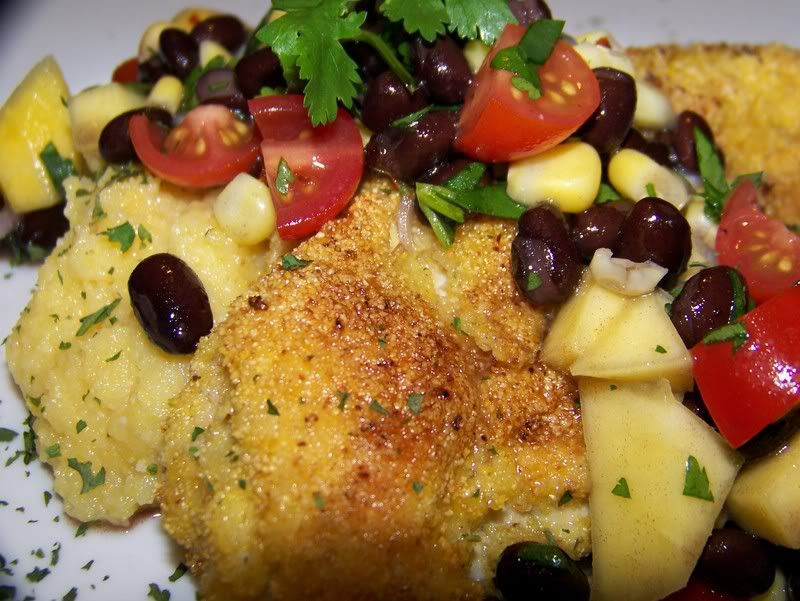
CORNMEAL AND CORRIANDER CRUSTED CHICKEN with BLACK BEAN AND MANGO "SALSA"
...for the chicken:
4 slightly pounded boneless, skinless chicken breasts
1/4 cup yellow cornmeal
1 tbsp ground corriander
1 tbsp olive oil
...for the salsa:
1 ripe mango, peeled and diced
1/2 cup corn (if using frozen, thawed)
1 can of black beans, drained and rinsed
1 large shallot, finely diced
1/4 cup cherry or grape tomatoes, diced
2 tbsp finely chopped cilantro (or parsley, if you do not like cilantro)
2 tbsp cider vinegar
1 tsp olive oil
salt and pepper, to taste
Place cornmeal and corriander in a large plate and mix with fingertips. Dredge each chicken breast into the mixture until coated.
Heat oil in a large skillet over medium-high heat. Cook chicken approximately 7 minutes on each side, until completely cooked through, and the crust turns a nice golden brown.
Meanwhile, mix together all salsa ingredients - tasting before adding salt for seasoning.
Serve by spooning the salsa over the chicken!
This meal took about 15 minutes to put together, start to finish - so it is the perfect "on the go" dinner. I also whipped up a batch of polenta made the cornmeal, chicken stock and milk (instead of cream and butter). No salt. And you know what?! It totally didn't even need it - - the salsa was the perfect compliment without being overpowering.
Tuesday, November 06, 2007
Times are a ch-ch-changin'
The past couple of times that I have gone to my doctor, my blood pressure has been high. Since I was either sick or in pain (or both), they didn't worry too much - but I was asked to return for a quick blood pressure check when I was feeling better. Last week, I did.
And the results were not pretty.
No more Creamy Beef Stroganoff...no more Mac and Cheese...no more Baby Back Ribs! No more of my absolute favorites!!! Whaaaaaaa! It really is hell on earth right now, but I have to keep reminding myself that it is time to take care of me.
This weekend marked the beginning of a newer, healthier Kat. I'm ready to give this low sodium/low fat/lower carb thing a try. I have to.
And the results were not pretty.
No more Creamy Beef Stroganoff...no more Mac and Cheese...no more Baby Back Ribs! No more of my absolute favorites!!! Whaaaaaaa! It really is hell on earth right now, but I have to keep reminding myself that it is time to take care of me.
This weekend marked the beginning of a newer, healthier Kat. I'm ready to give this low sodium/low fat/lower carb thing a try. I have to.
Tuesday, October 30, 2007
Giving you the finger
Halloween is tomorrow, so it is only fitting that we celebrate with something creepy!
1 cup butter, softened
1 1/2 cups confectioner's sugar
1 egg
1 tsp vanilla
1/2 tsp almond extract
2 1/2 cups flour
1 tsp baking soda
1 tsp cream of tartar
In a large bowl, mix together butter, confectioner's sugar, egg, vanilla and almond extracts. Blend in flour, soda and cream of tartar. Form dough into a ball, cover and chill for 2-3 hours.
Preheat oven to 375 degrees.
Divide dough. Roll out tiny finger shapes on a lightly floured surface, pinching around the knuckle area to create a knarly shape. (The first batch I did was so big, that I scaled down the dough on the second batch - which worked perfectly.) Use a knife to create the lines of the knuckles. Gently place an almond slice as the fingernail. Place on a greased cookie sheet. Bake 7-8 minutes. Cool on a wire rack.
 Sugar Cookie Fingers! Ewwwwww!
I saw an original recipe at http://www.epicurious.com/, but decided to use my family's "Delux Sugar Cookie" recipe, since those cookies come out perfect every time. Everyone is totally freaked out by the fingers this morning at work!
DELUX SUGAR COOKIES1 cup butter, softened
1 1/2 cups confectioner's sugar
1 egg
1 tsp vanilla
1/2 tsp almond extract
2 1/2 cups flour
1 tsp baking soda
1 tsp cream of tartar
In a large bowl, mix together butter, confectioner's sugar, egg, vanilla and almond extracts. Blend in flour, soda and cream of tartar. Form dough into a ball, cover and chill for 2-3 hours.
Preheat oven to 375 degrees.
Divide dough. Roll out tiny finger shapes on a lightly floured surface, pinching around the knuckle area to create a knarly shape. (The first batch I did was so big, that I scaled down the dough on the second batch - which worked perfectly.) Use a knife to create the lines of the knuckles. Gently place an almond slice as the fingernail. Place on a greased cookie sheet. Bake 7-8 minutes. Cool on a wire rack.
With the other half of the dough, I decided to make a cookie piano. (What better way to highlight my gorgeous fingers?!) The piano is frosted with vanilla and chocolate store-bought icing.
Tuesday, October 23, 2007
Beet Soup (don't be afraid!)
 I just love Autumn! We've finally begun to snap out of the Indian Summer we are courting, and allowed the chill to enter the air - and finally I can start to plan menus that involve some heavier flavors and longer cooking times. Plus, having the leaves changing colors brings on some much needed inspiration into my everyday cooking.
At the market this weekend, I spotted some very nice looking beets - firm and dark red with robust looking leafy greens attached. I hurriedly plucked them from their spot on the shelf - not really thinking about what I would do with them. The last time fresh beets were in my kitchen, I transformed them into tasty little
ravioli. This time I desperately wanted to make a soup.
So, I did.
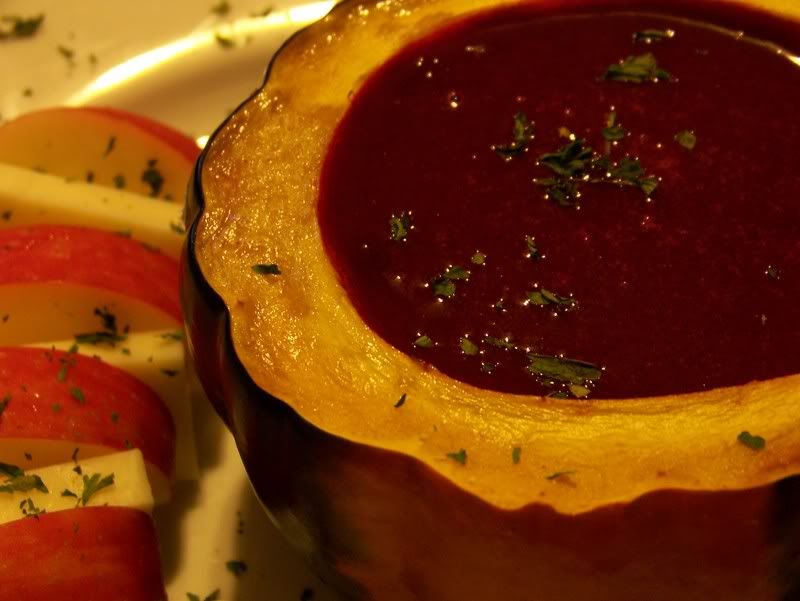
BEET SOUP (served in a roasted acorn squash "bowl")
5 medium beets, peeled* and diced
1 red-skinned tart apple, peeled and diced
1 smallish red onion, diced
2 cloves of garlic, finely minced
4 cups of chicken or vegetable stock (I used chicken stock, because I do not like the taste of veggie stock)
1 tbsp olive oil
2 tbsp apple cider vinegar
1 tbsp brown sugar
salt and pepper, to taste
If serving in an acorn squash bowl: Preheat oven to 375 degrees. Cut the top off the squash, and hollow out the insides. (if needed, take a little off the bottom, so that the bowl is stable) Place on a cookie sheet, brush a little olive oil into the cavities and season with salt. Roast for approximately 60 minutes, or until the flesh is tender. Remove from heat and let cool slightly.
Meanwhile, heat oil in a large pot and cook onion and garlic until the onion becomes translucent. Add apple and beets and cook for approximately 5 minutes, stirring often. Add stock and let simmer for about an hour, or until the beets are fork tender. Remove from heat and add vinegar and brown sugar.
Blend soup with either an immersion blender or a food processor. (I used an immersion blender first and then had to clean off the wall! A food processor is a little less messy believe it or not!) Add water to achieve the consistency you like. Season with salt and pepper and serve.
*Unless you want red hands, invest in some disposable latex or fitted plastic gloves...beets will stain just about anything they come in contact with including skin and cutting boards! You were warned!!! I will be rocking the purple handed look tomorrow at work.
I was blown away at first bite! The beet soup was sweet, yet had a hint of tartness from the vinegar - and the flavor of the overall dish was subtle and delicious. The color was so vibrant and beautiful that I almost didn't want to dip my spoon into it. Using the acorn squash (my favorite of all the squashes) was awesome, because it gave the meal a little more substance as well as a bit of whimsy. The flesh of the squash went so well with the soup itself. The next time I make this, I may add a dollop of sour cream or Greek yogurt to richen the soup up just a bit.
Stick your vegetables in something cheesy!
There has been a recent influx of cookbooks designed to take healthy vegetables and disguise them in everyday meals. Jessica Seinfeld, wife of comedian Jerry Seinfeld, recently wrote a cookbook entitled Deceptively Delicious. From the Publisher: Deceptively Delicious has all of Jessica's winning combinations, including cauliflower in mac and cheese and spinach in brownies.
Forgive me, but WHAT THE FUCK?! If someone tries to feed me a brownie with spinach in it, I will punch them in the face! I definitely do not agree with this method of cooking because I think it could cause more harm them good - if a child isn't given the opportunity to try new tastes, that kid is going to grow up into an insufferably picky adult!
(Have you ever been to a restaurant with a person who hates everything except chicken nuggets? It makes me want to scratch my eyes out, and I am not even an adventurous eater! "Can you omit the onions?" WHOA lady!!!! No! Just stop already!)
I cook and bake regularly with my niece Kelsey and nephew Shakeer - avid readers will remember our forray into Christmas cookies. I found that if they participate in the food prep, they are more likely to eat something new...plus, they love to help out in the kitchen. Banning children from the kitchen can make things easier, but you are seriously missing out on a great experience, as well as the opportunity to teach them about good nutrition.
That being said - I totally found a recipe that hid a great deal of perfectly tasty vegetables under a melting mound of delicious cheese! I'm such a hypocrite!
SWEET PEA AND ARTICHOKE LASAGNA
12 no-boil lasagna noodles
2 (15 oz.) containers of ricotta cheese
1 1/2 cups whipping cream
1 (1 lb) bag of frozen peas, thawed
1/4 cup fresh basil
3/4 cup grated parmesan cheese
4 cups mozzarella cheese
2 eggs
2 jars of marinated artichokes, drained
salt and pepper
Preheat oven to 350 degrees.
Brush a 13x9x2 baking dish with oil, and set aside. In a small bowl, combine drained artichokes, 1/2 cup of cream and basil. Set aside. In a large blender or food processor, combine peas, ricotta, parmesan cheese, 1 cup of whipping cream, salt and pepper and 2 eggs. (I had to do this in 2 batches.)
Pour 1 cup of ricotta mixture in the bottom of the baking dish. Layer 4 lasanga noodles, then 1/2 of artichoke mixutre, then 1/3 of the ricotta mixture. Sprinkle 1 cup of mozzarella cheese. Repeat process with second layer.
For the last layer - 4 additional noodles, rest of ricotta mixture and 2 cups of mozzarella cheese. Cover with foil and bake for 30 minutes. Remove foil and bake for another 25 minutes or until cheese has browned slightly, and is bubbly around the edges. Remove from oven and let stand 15 minutes before serving.
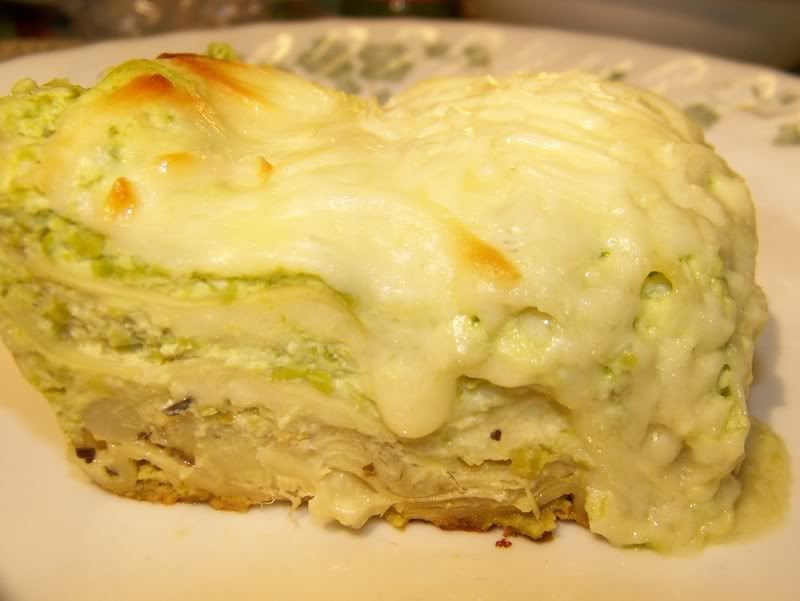
Yes, it's a little time consuming - but the reward is this sweet and creamy, yet tangy combination of flavors. I never even missed the tomato sauce! The bottom layer of noodles almost becomes this crust of sorts - anchoring the whole dish. Plus, just look at the color of the layers...it's quite eye catching, and everyone knows, you eat with your eyes first.
I ate the leftovers for 3 days!
Forgive me, but WHAT THE FUCK?! If someone tries to feed me a brownie with spinach in it, I will punch them in the face! I definitely do not agree with this method of cooking because I think it could cause more harm them good - if a child isn't given the opportunity to try new tastes, that kid is going to grow up into an insufferably picky adult!
(Have you ever been to a restaurant with a person who hates everything except chicken nuggets? It makes me want to scratch my eyes out, and I am not even an adventurous eater! "Can you omit the onions?" WHOA lady!!!! No! Just stop already!)
I cook and bake regularly with my niece Kelsey and nephew Shakeer - avid readers will remember our forray into Christmas cookies. I found that if they participate in the food prep, they are more likely to eat something new...plus, they love to help out in the kitchen. Banning children from the kitchen can make things easier, but you are seriously missing out on a great experience, as well as the opportunity to teach them about good nutrition.
That being said - I totally found a recipe that hid a great deal of perfectly tasty vegetables under a melting mound of delicious cheese! I'm such a hypocrite!
SWEET PEA AND ARTICHOKE LASAGNA
12 no-boil lasagna noodles
2 (15 oz.) containers of ricotta cheese
1 1/2 cups whipping cream
1 (1 lb) bag of frozen peas, thawed
1/4 cup fresh basil
3/4 cup grated parmesan cheese
4 cups mozzarella cheese
2 eggs
2 jars of marinated artichokes, drained
salt and pepper
Preheat oven to 350 degrees.
Brush a 13x9x2 baking dish with oil, and set aside. In a small bowl, combine drained artichokes, 1/2 cup of cream and basil. Set aside. In a large blender or food processor, combine peas, ricotta, parmesan cheese, 1 cup of whipping cream, salt and pepper and 2 eggs. (I had to do this in 2 batches.)
Pour 1 cup of ricotta mixture in the bottom of the baking dish. Layer 4 lasanga noodles, then 1/2 of artichoke mixutre, then 1/3 of the ricotta mixture. Sprinkle 1 cup of mozzarella cheese. Repeat process with second layer.
For the last layer - 4 additional noodles, rest of ricotta mixture and 2 cups of mozzarella cheese. Cover with foil and bake for 30 minutes. Remove foil and bake for another 25 minutes or until cheese has browned slightly, and is bubbly around the edges. Remove from oven and let stand 15 minutes before serving.
Yes, it's a little time consuming - but the reward is this sweet and creamy, yet tangy combination of flavors. I never even missed the tomato sauce! The bottom layer of noodles almost becomes this crust of sorts - anchoring the whole dish. Plus, just look at the color of the layers...it's quite eye catching, and everyone knows, you eat with your eyes first.
I ate the leftovers for 3 days!
Subscribe to:
Posts (Atom)